Handheld POS System: What to Look For Before You Buy
Service slows when staff walks to a terminal. A handheld POS system puts ordering and payments on the floor. Compare options, payments, setup tips, and ROI.
When guests wait to order, checks stack up at the end of the rush, and staff keeps walking back to a fixed terminal, service drags and mistakes rise. A handheld POS system fixes that by putting order entry and payments in your team’s hands, right on the floor.
This guide breaks down what a handheld setup does, where it fits best, how it compares to traditional terminals, and what to look for in hardware, software, and payments so you can speed up service and tighten accuracy from the first ticket to the final closeout.
What is a Handheld POS System?
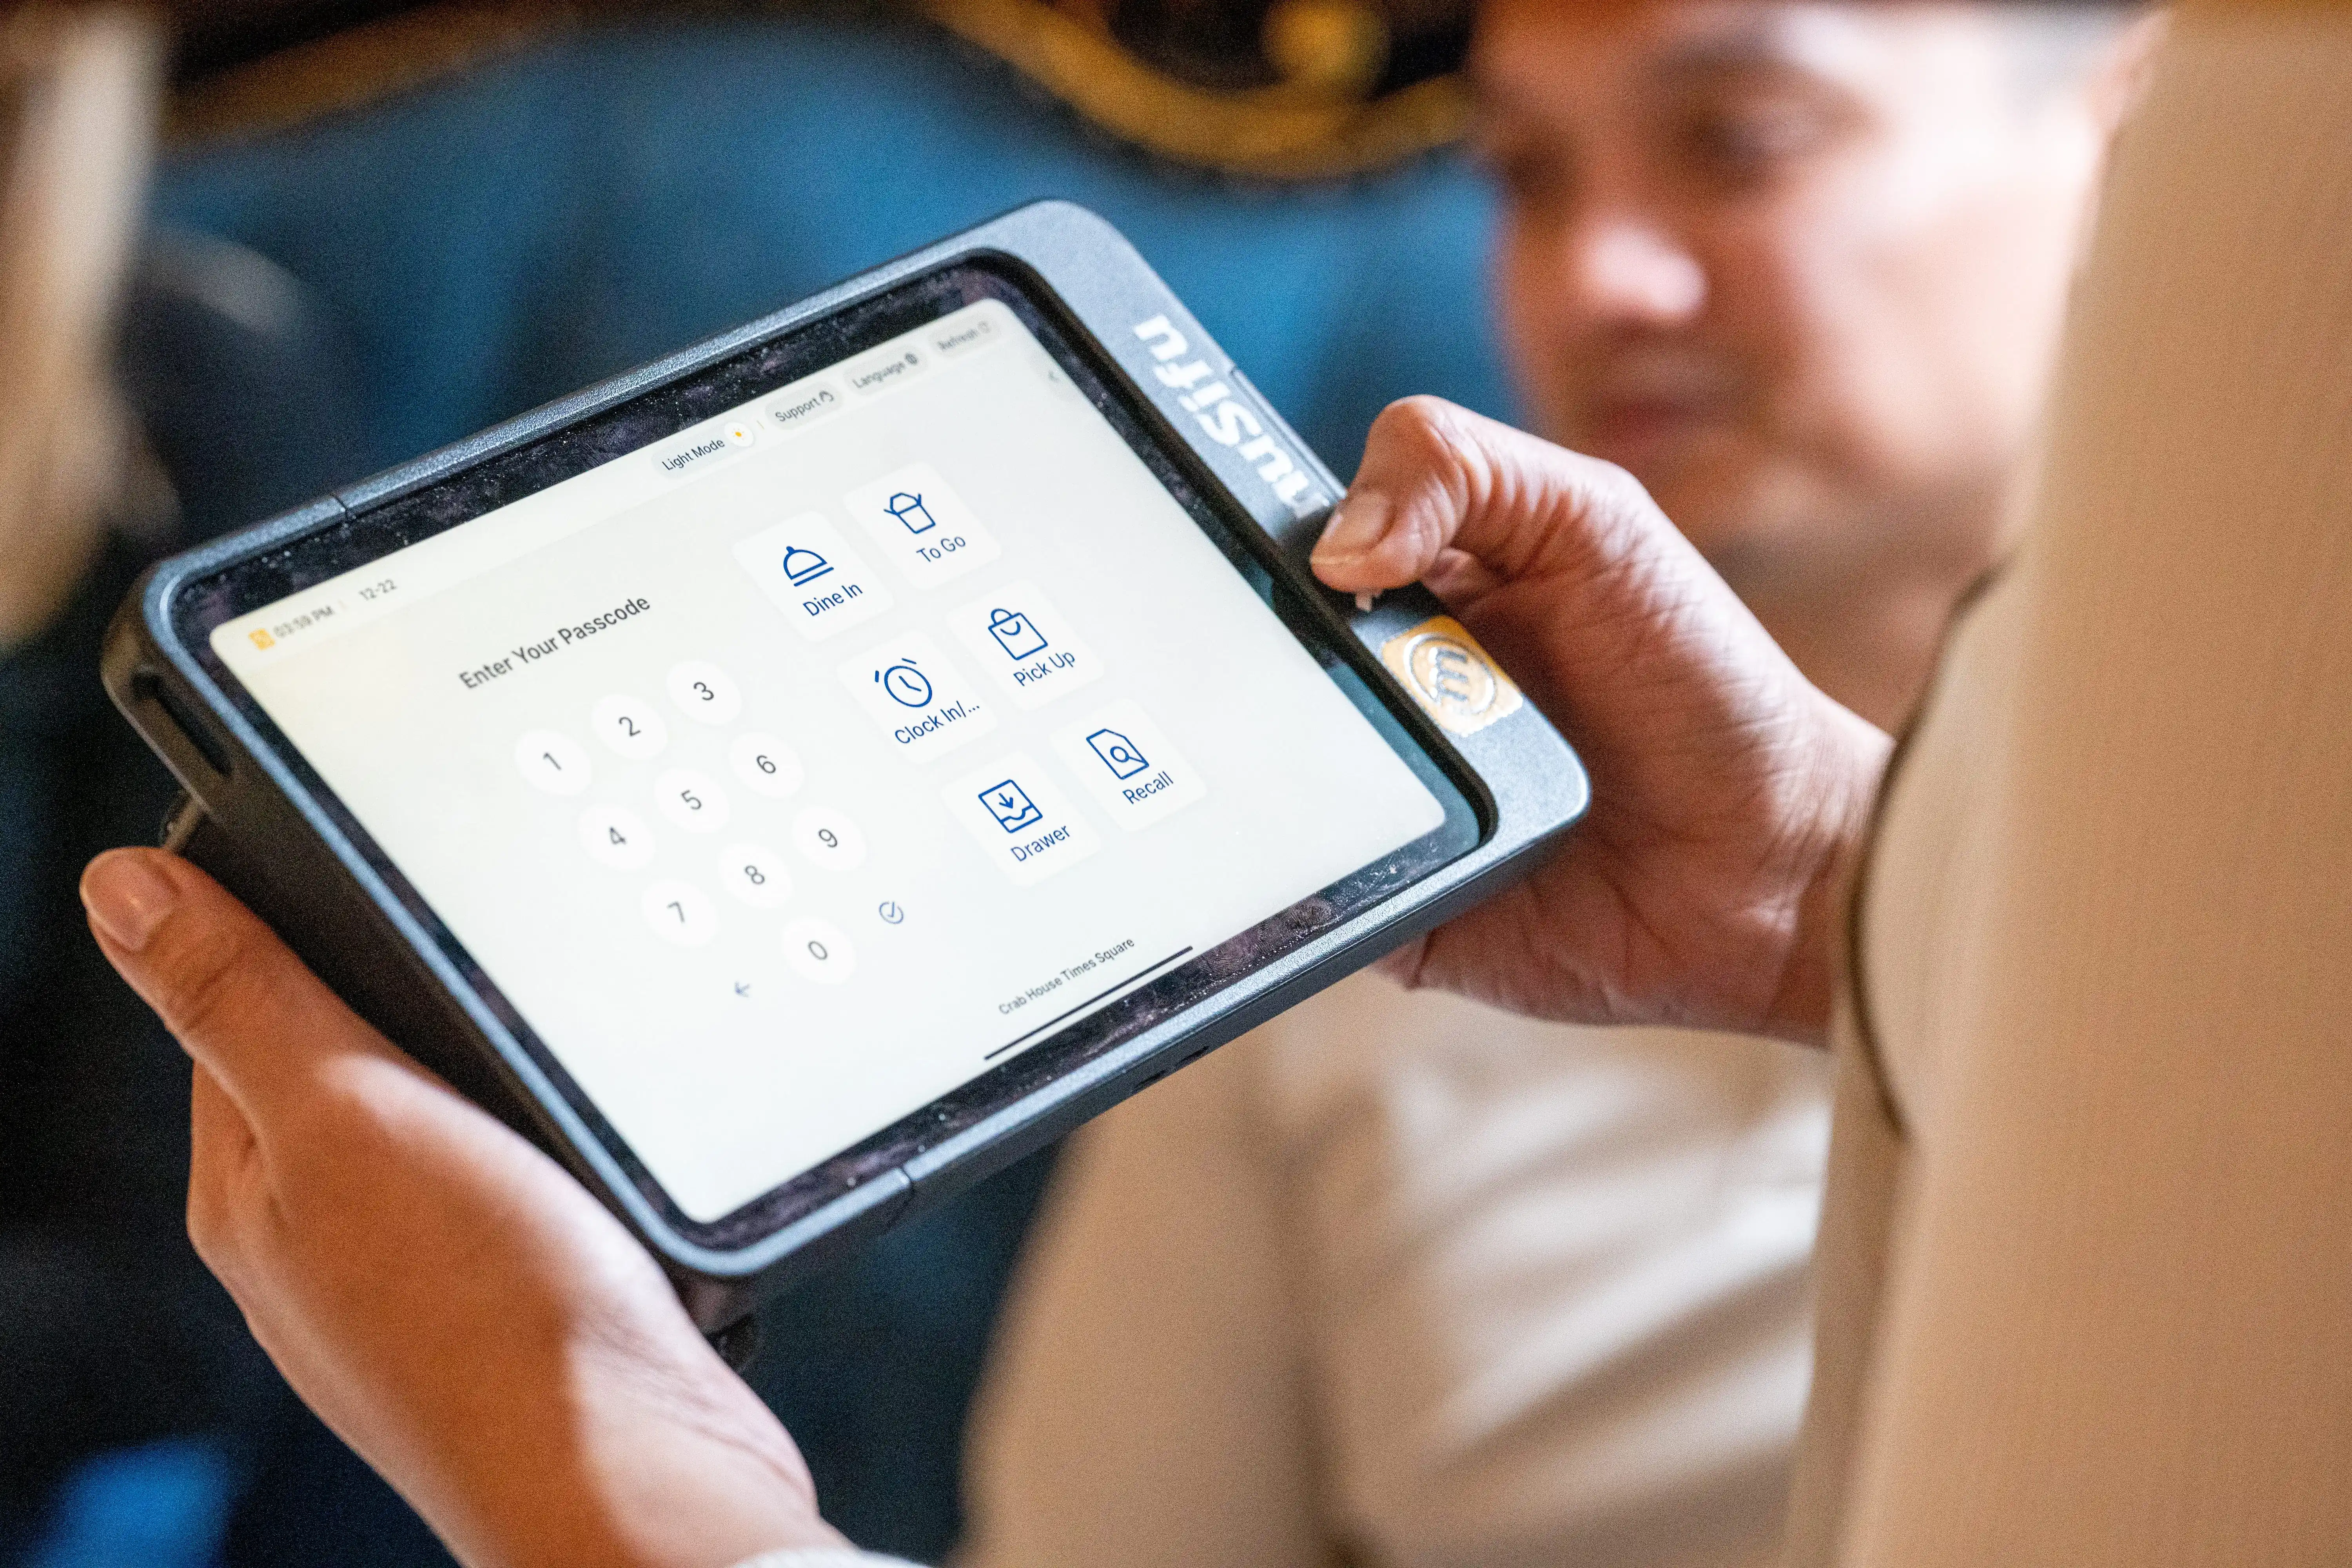
A handheld POS system is a mobile device your team carries to take orders, send tickets to the kitchen, accept payments, and manage tabs right from the floor. Instead of walking back to a fixed station, staff enters items at the table, at the bar, on the patio, or near the pickup area to keep service moving.
Handhelds help most when you want to:
Speed up table service and reduce order errors by entering items as guests speak.
Keep bar tabs moving during rushes and close checks faster.
Bust counter lines by taking orders on the floor and keeping runners focused on handoff and delivery.
If your team spends too much time bouncing between guests and a terminal, handheld service can tighten your flow in a single shift.
Handheld POS Systems for Restaurants: Where They Fit Best
A handheld setup pays off most when your team moves constantly, lines build quickly, or checks pile up at the end of a rush. Here are the restaurant formats where it tends to deliver the quickest wins.
1. Full-service dining
Take orders tableside and send them to the kitchen right away.
Capture modifiers as guests speak, so fewer items need re-rings.
Close out with pay-at-table so servers stop circling back to a fixed station.
Turn tables faster during peak hours by tightening the order-to-payment flow.
2. Casual dining and bar & grill
Open and manage tabs from the bar top, the dining room, or the patio.
Fire rounds faster during rush periods and keep tickets moving to the kitchen.
Handle quick reorders and add-ons the moment guests ask, especially on patios and during events.
Speed up closeouts at the end of the night when many checks hit at once.
3. Fast casual and counter service with runners
Take orders away from the counter when lines stretch, then route them to prep instantly.
Keep runners moving by reducing trips back to the POS station for edits or add-ons.
Prompt easy upsells at the point of order, so add-ons land on the ticket before the runner leaves the floor.
Reduce counter congestion during lunch and dinner surges.
If these situations sound familiar, a handheld workflow can help your staff spend less time walking and more time serving.
Handheld POS vs Traditional Terminals
A fixed terminal works fine for cash handling, manager tasks, and back-office edits. The problem starts when every order and every payment pulls your team off the floor. That’s where handheld POS changes the flow.
How the workflow differs
Traditional terminals: Staff walks to a station, enters the order, returns to the table, then repeats the trip at checkout. During rushes, that travel time stacks up.
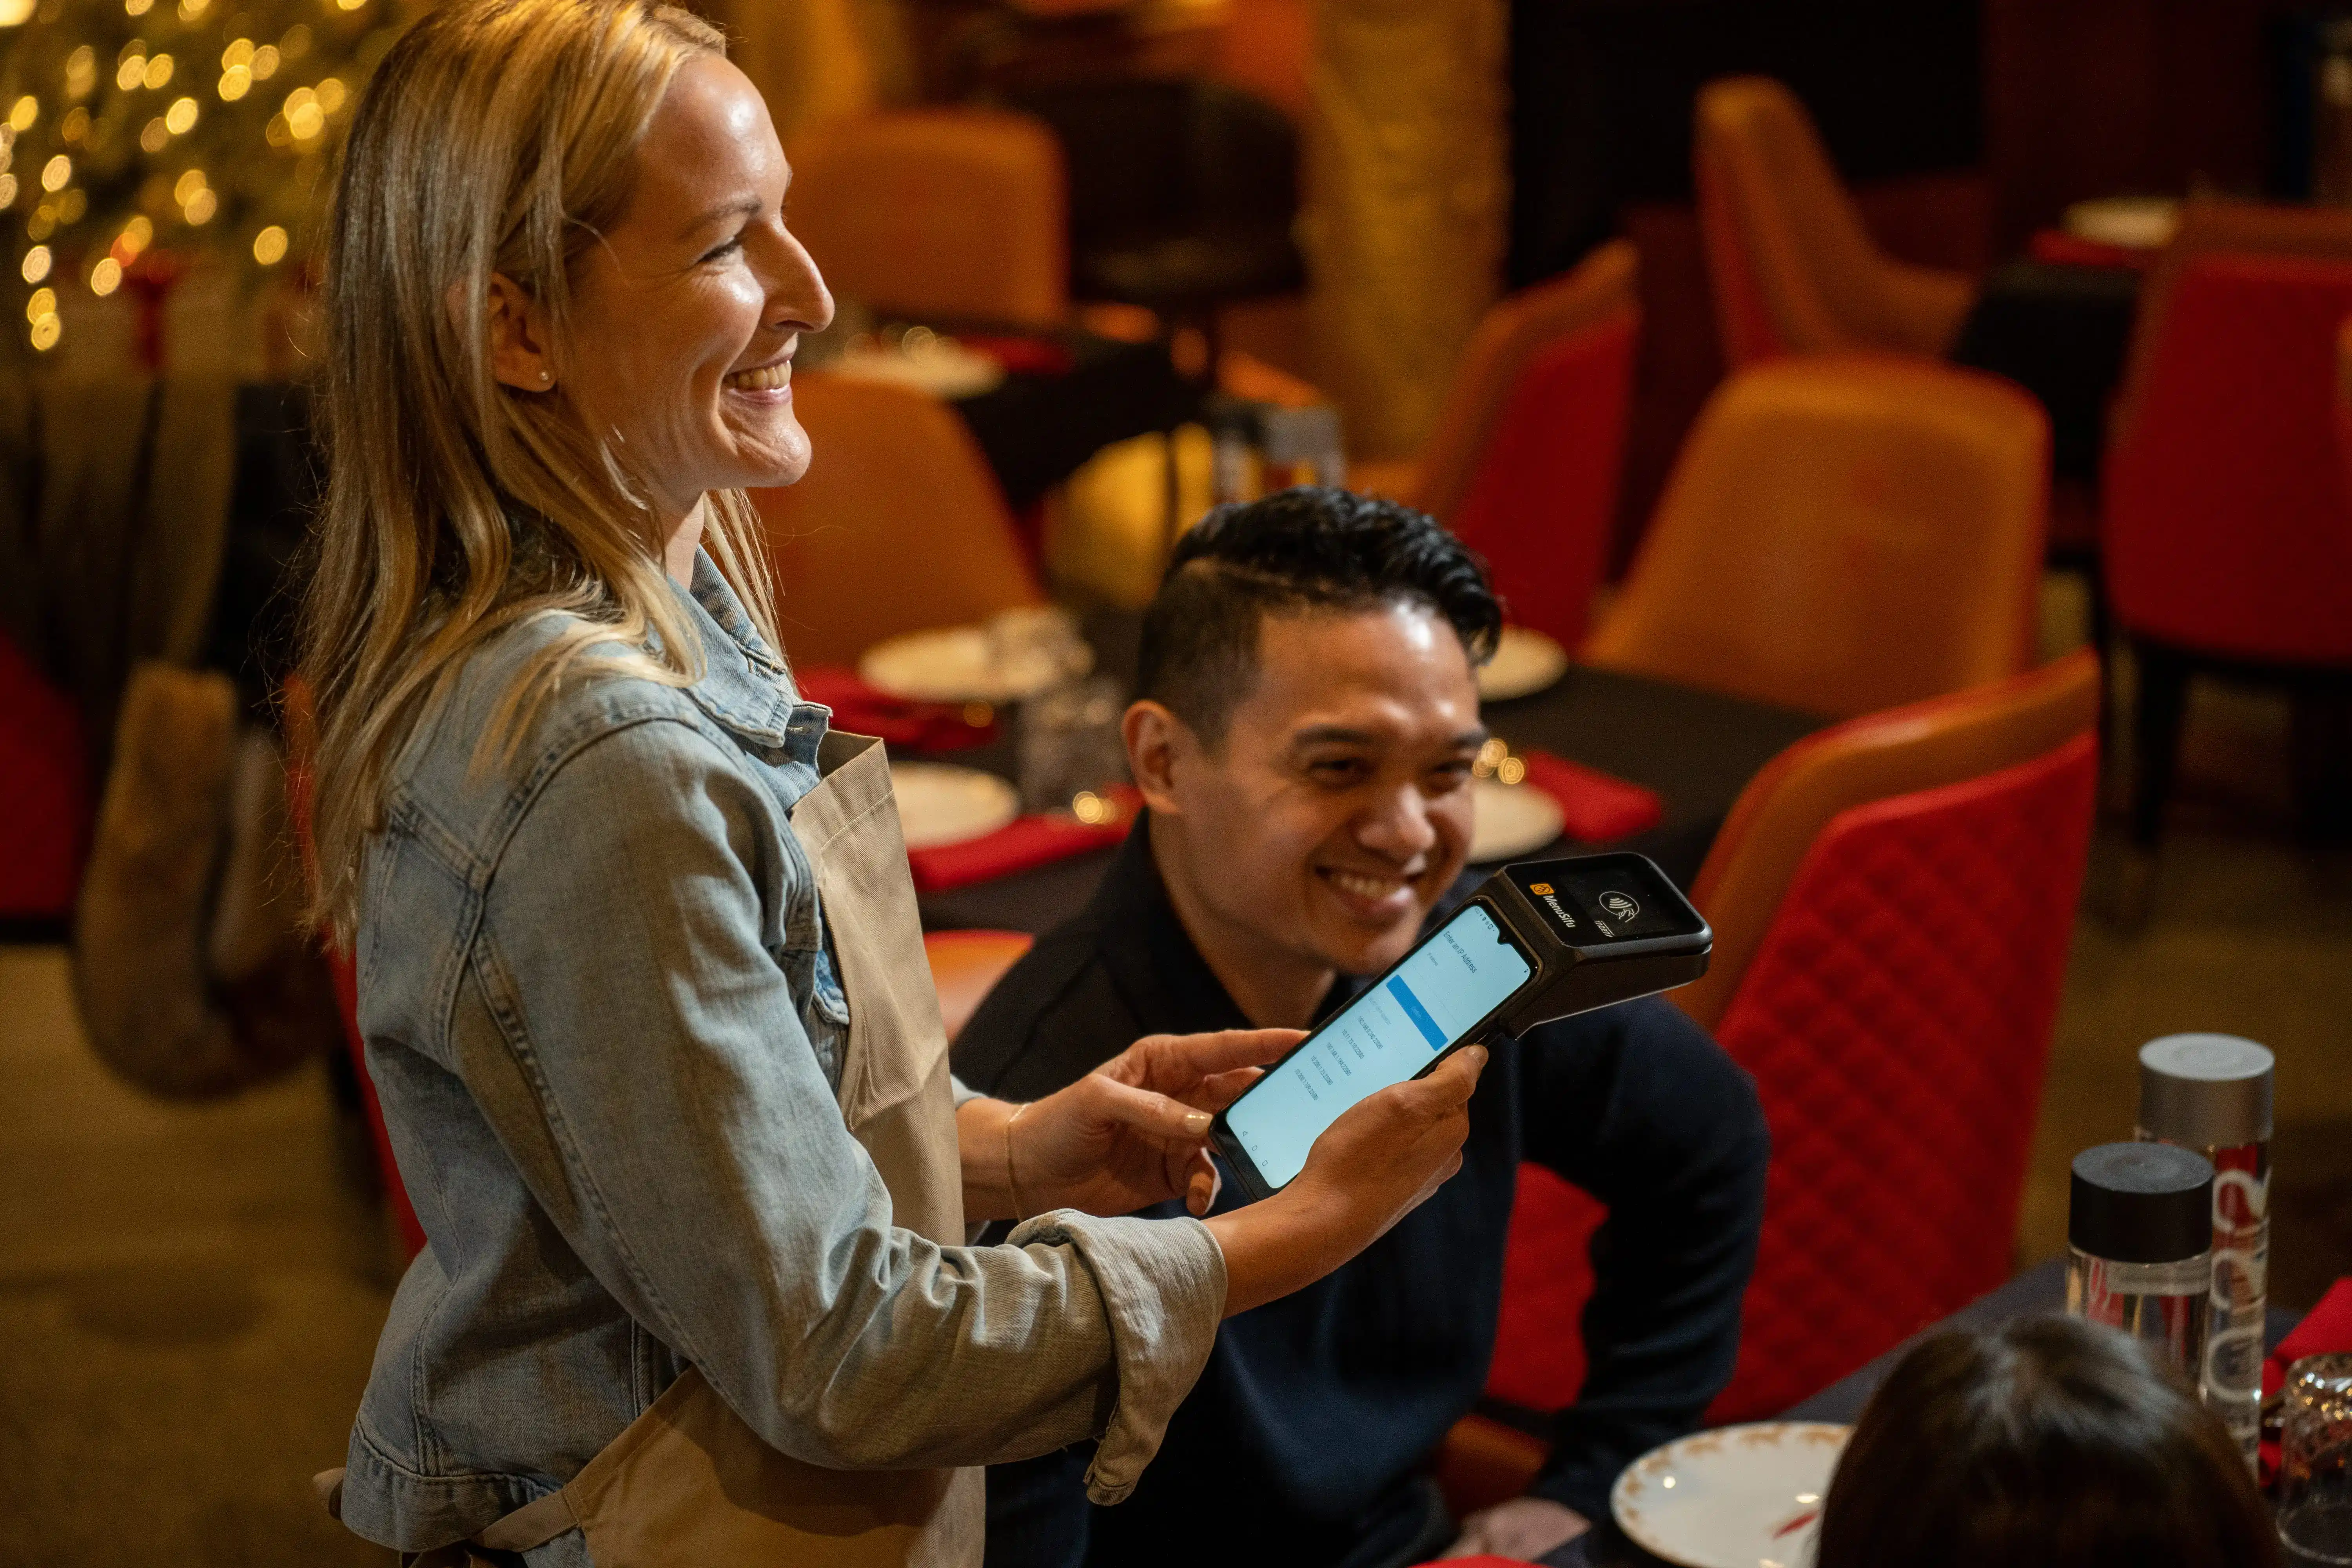
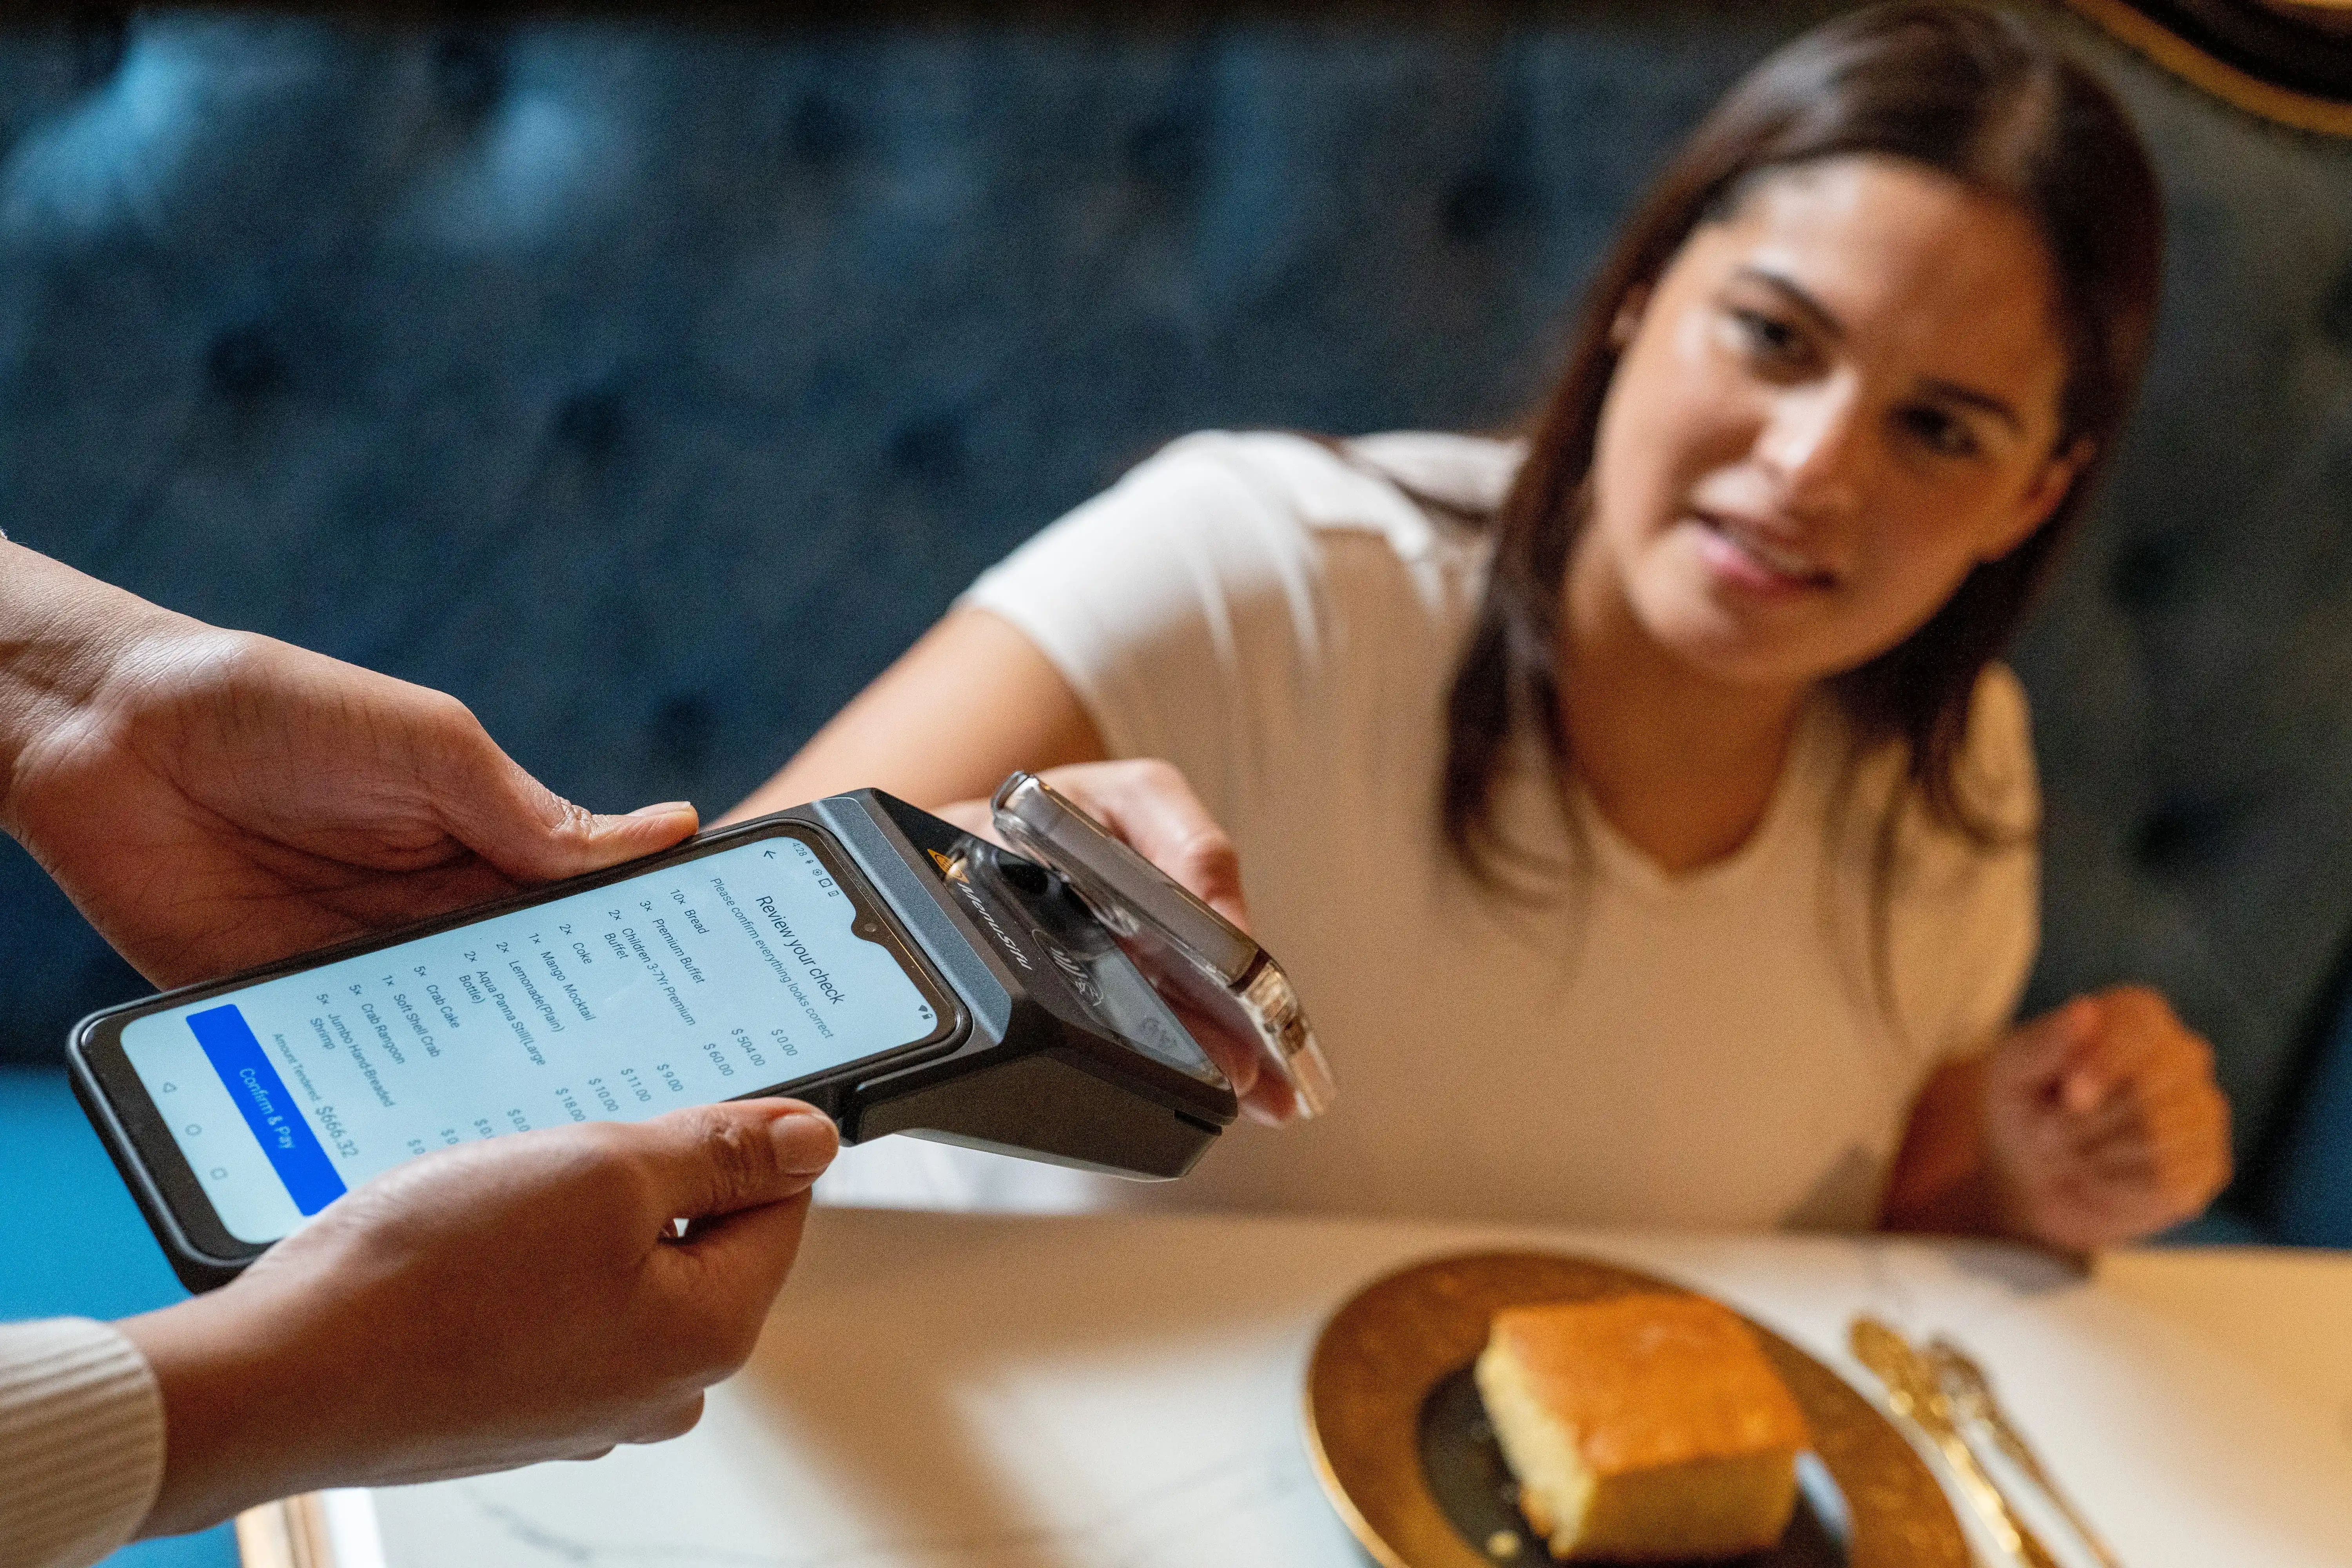
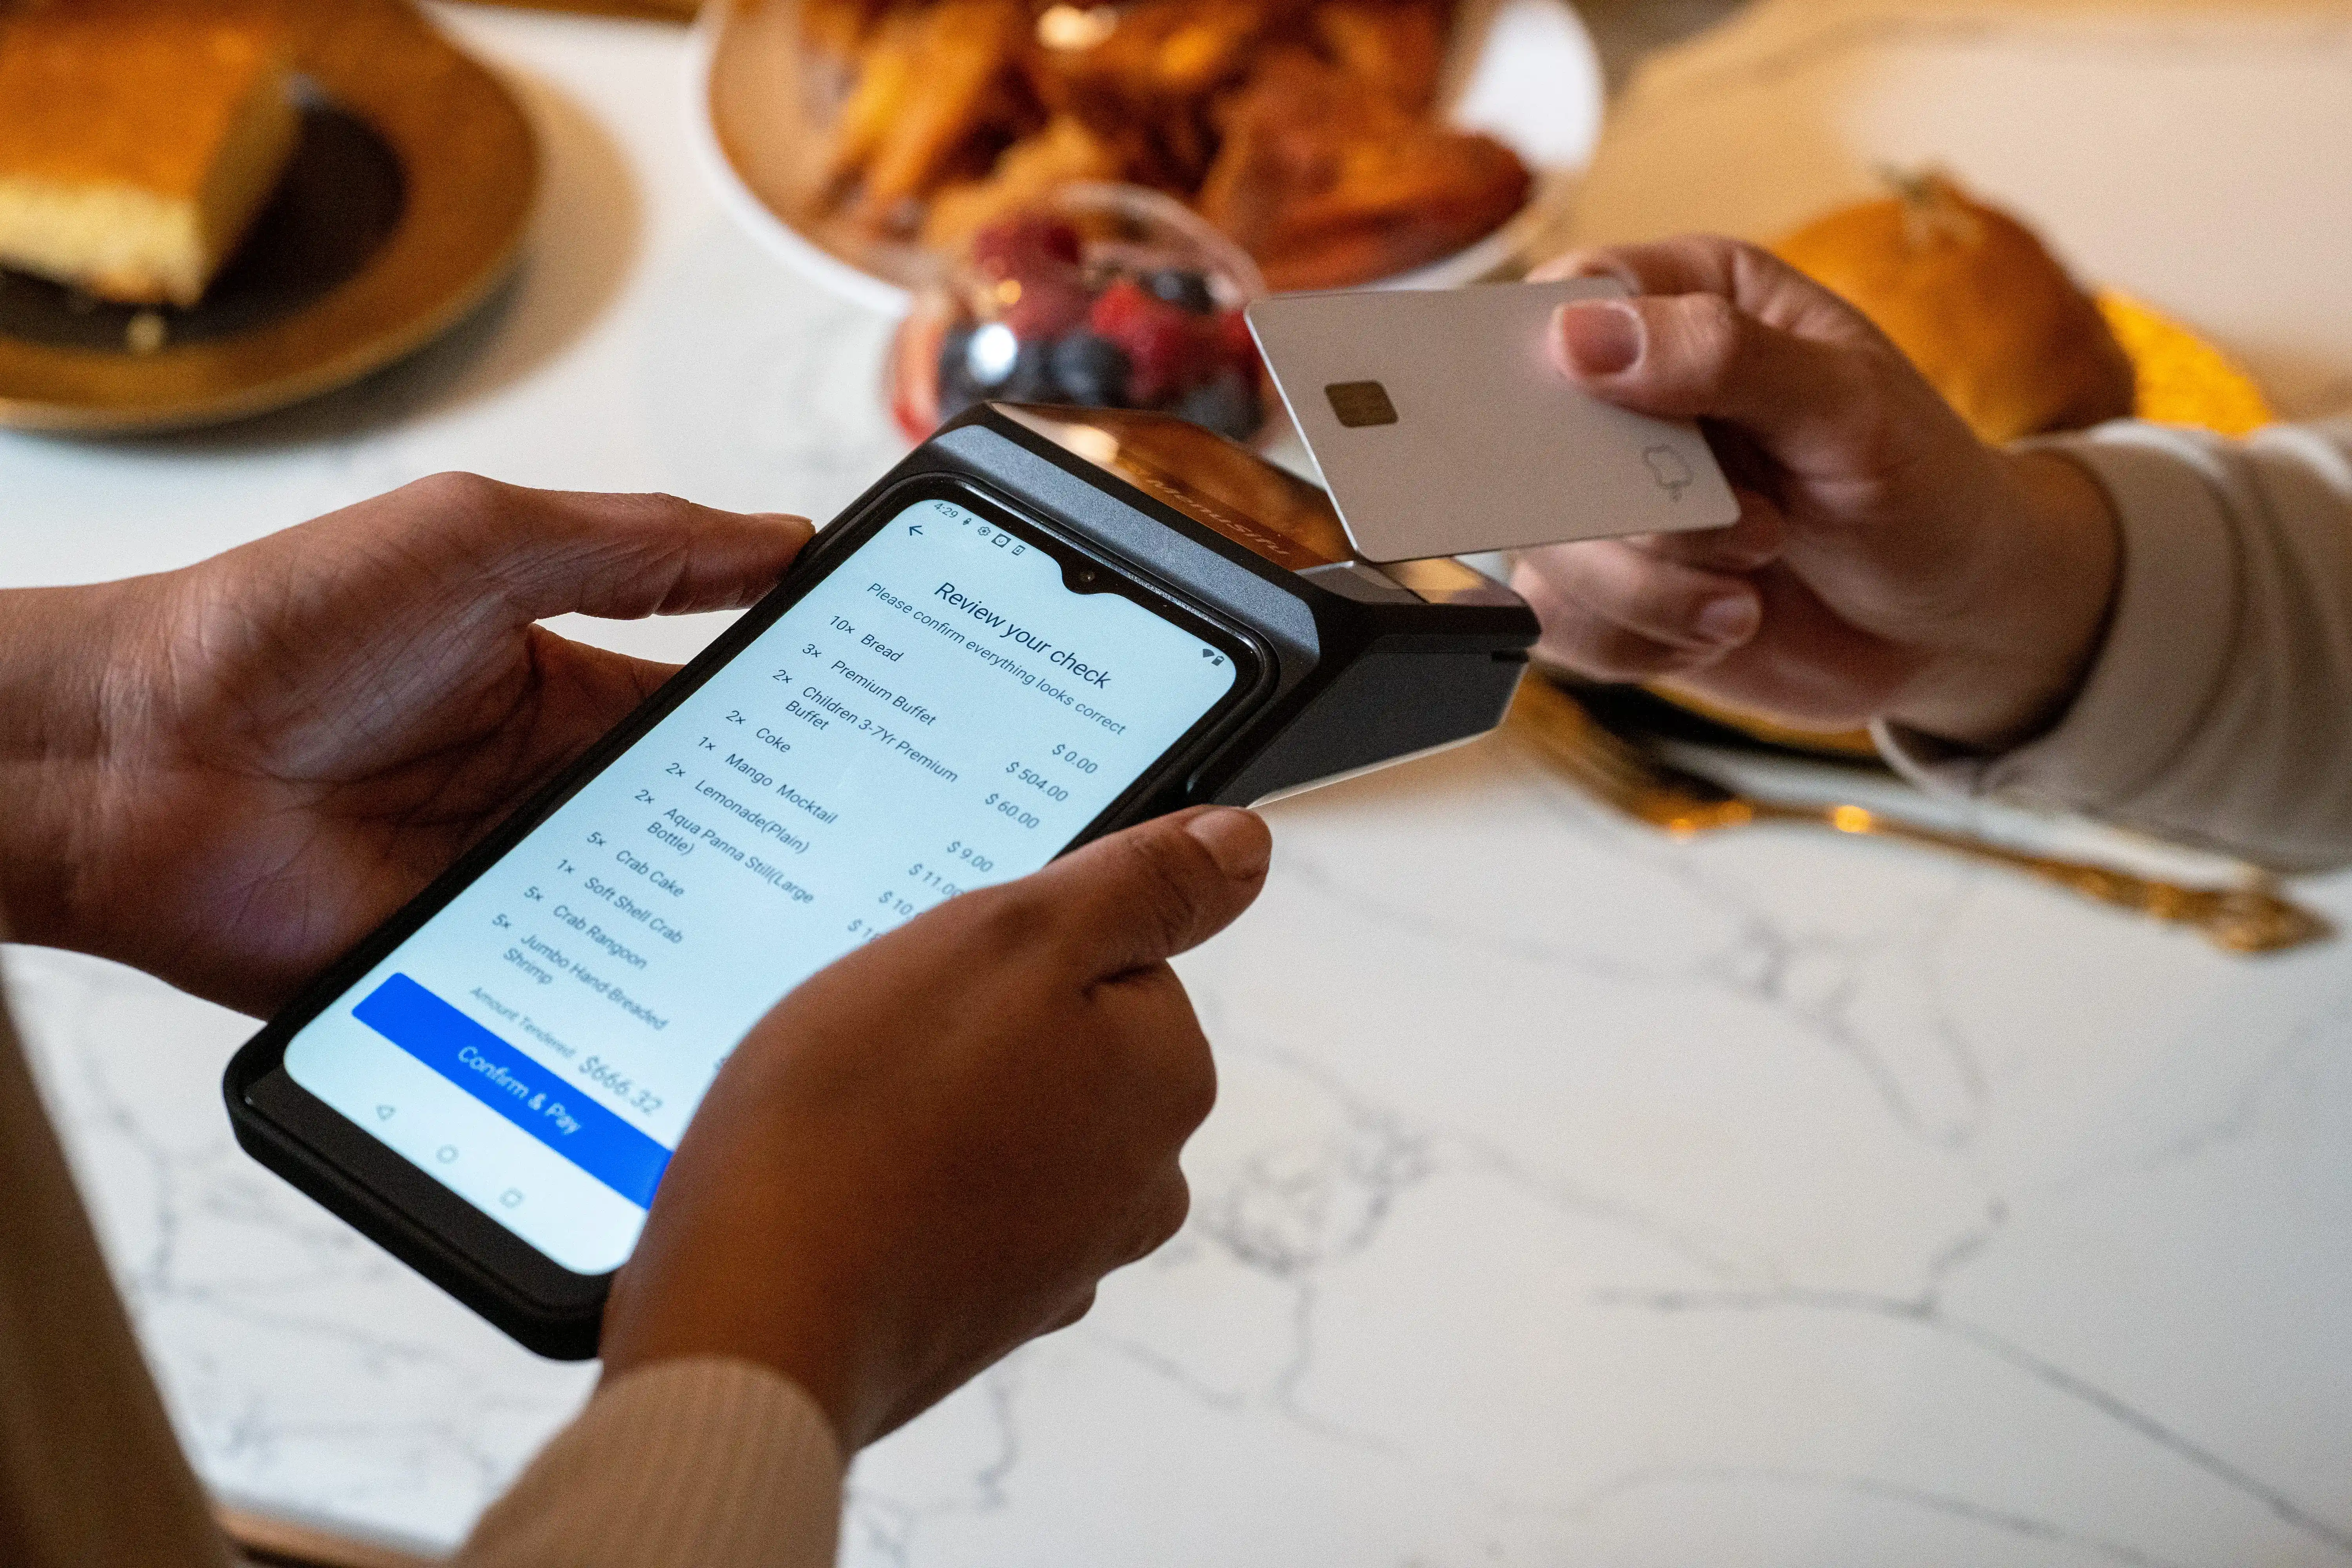
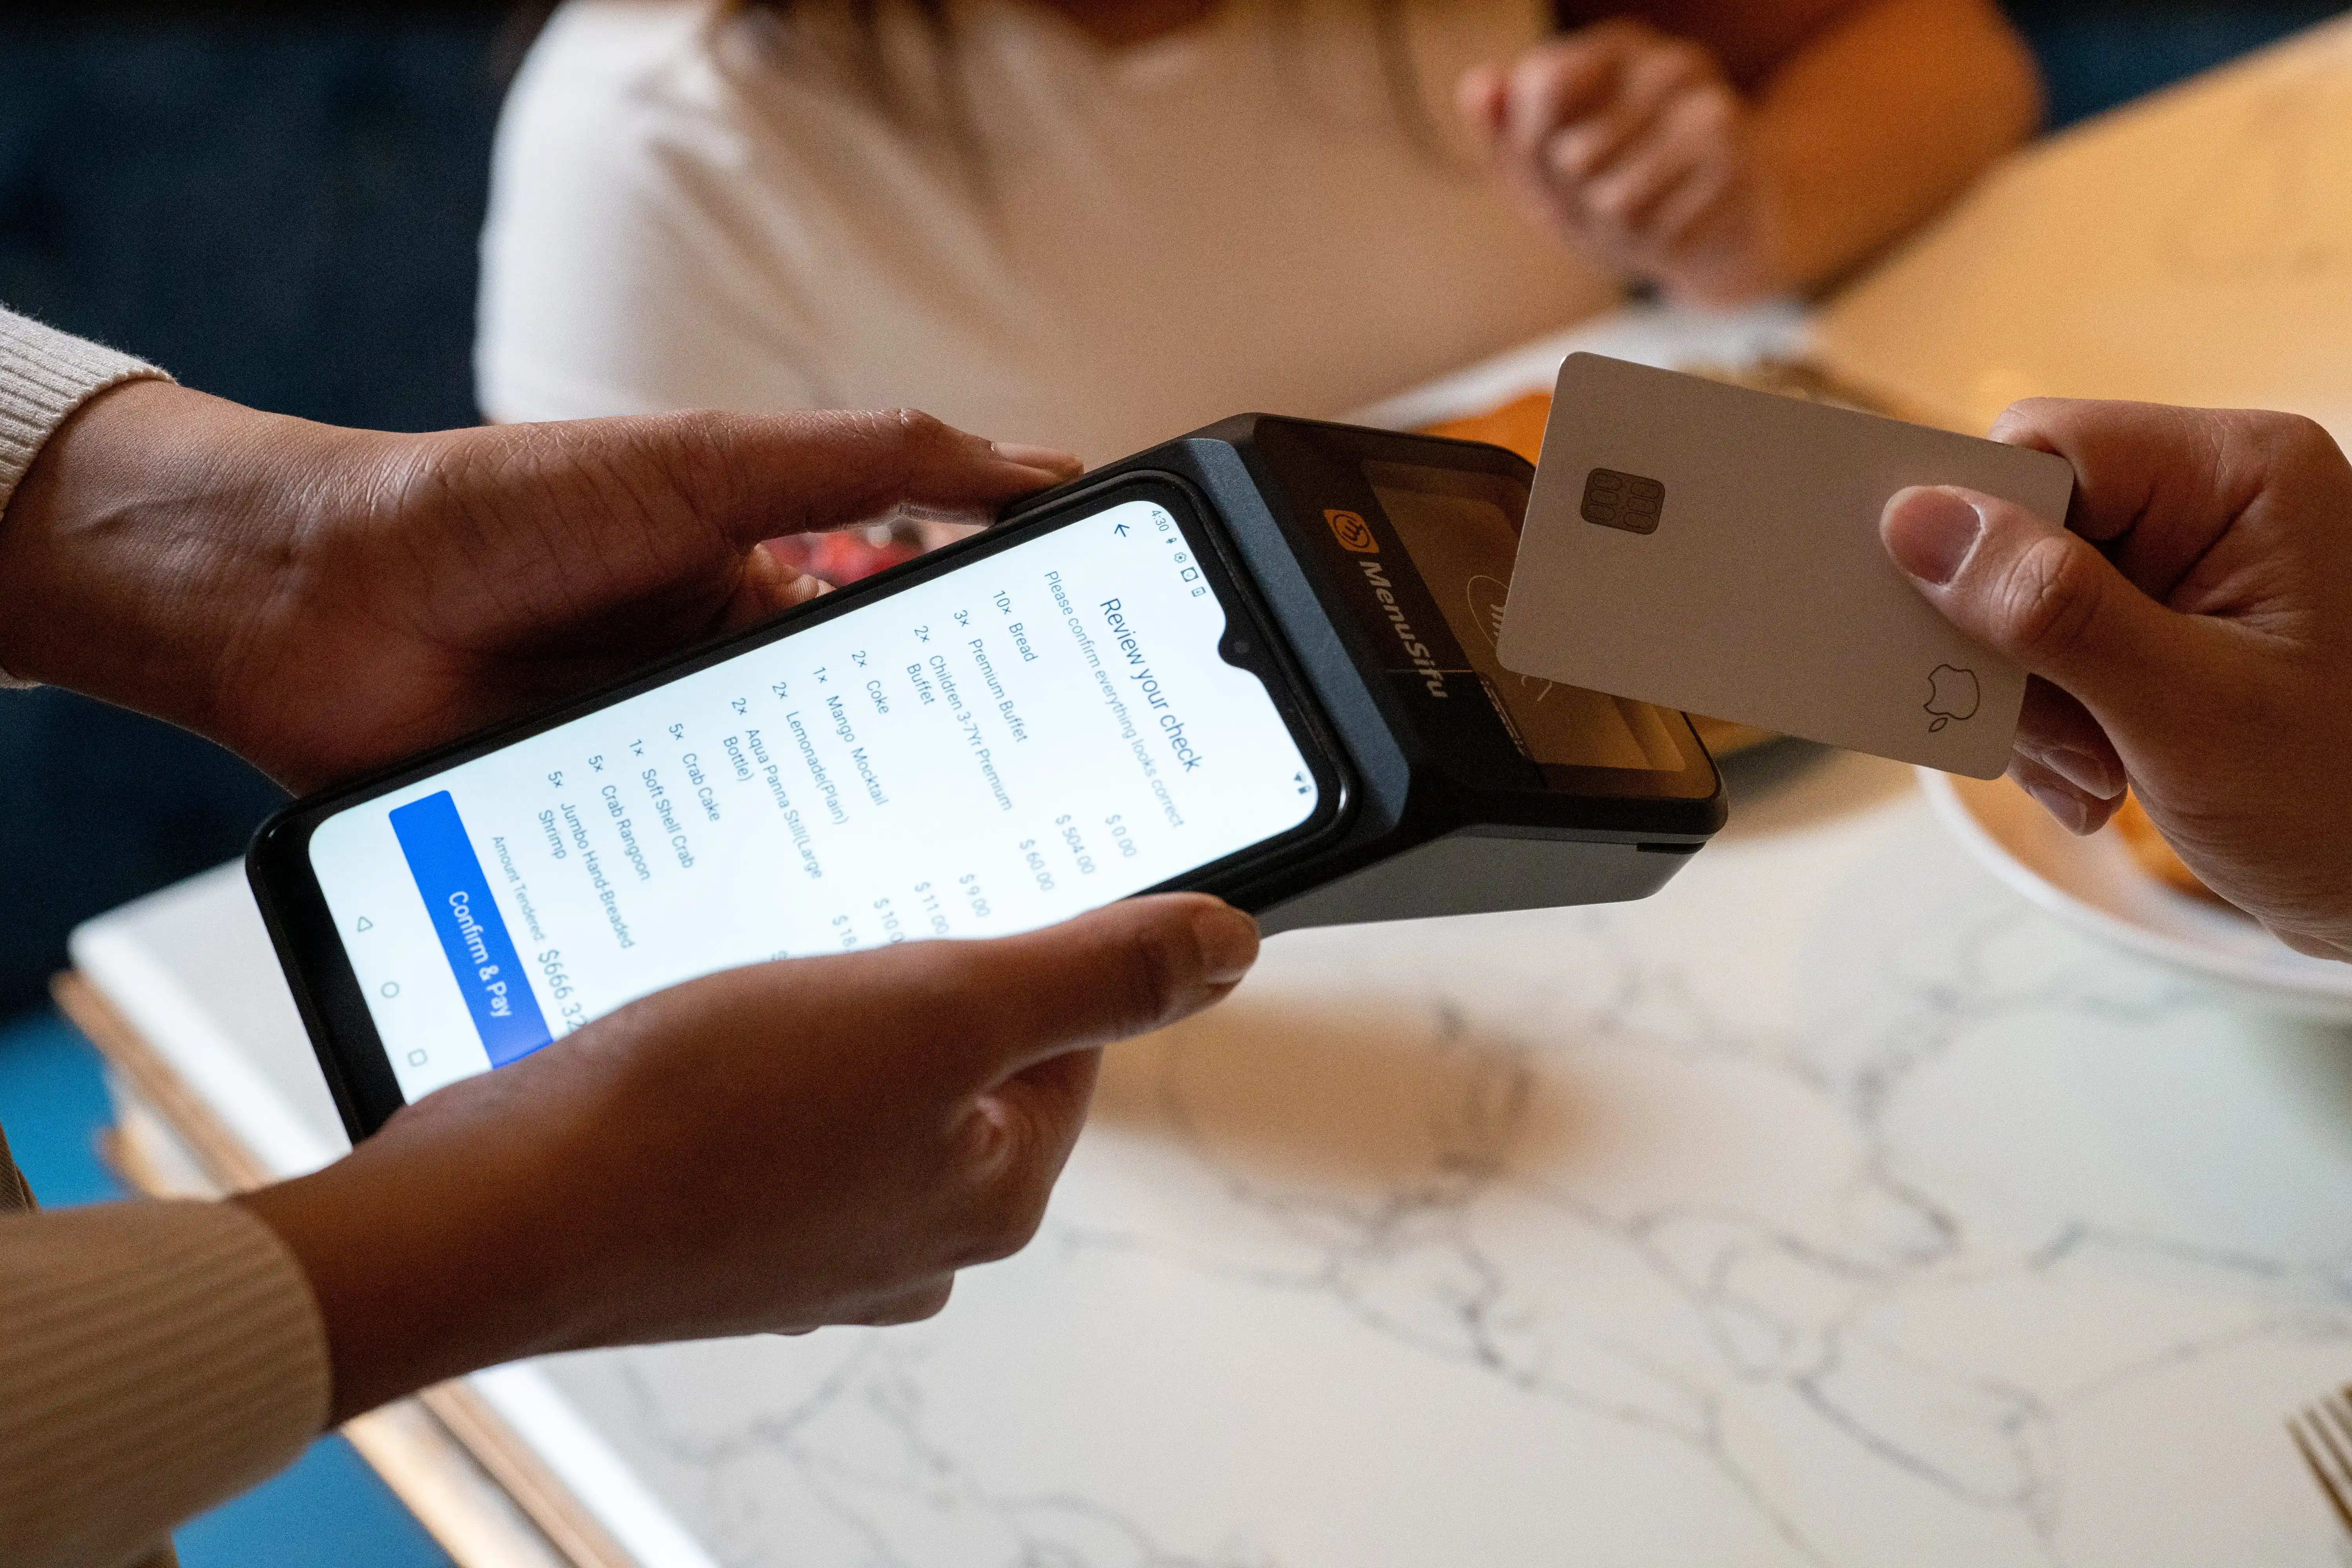
A handheld POS system: Staff takes the order at the table, sends it to the kitchen right away, and can close the check on the spot. Guests get faster service and your team covers more tables with fewer steps.
Common myths to ignore
“It’s just an iPad.” A restaurant-ready handheld POS terminal focuses on durability, battery life, and service-first screens.
“It’s only for payments.” A good setup handles ordering, modifiers, seat numbers, split checks, tabs, and kitchen sends, plus payments.
“It’s only for big chains.” Independents use handhelds to speed up turns, cut errors, and reduce extra steps during peak service.
Many restaurants run a hybrid setup: fixed terminals for admin and cash, handhelds for service and pay-at-table. This keeps your floor moving and your stations clear when it gets busy.
How to Choose a Handheld POS Terminal
Pick a device your team can hold for hours, tap quickly during rush, and trust through a full shift. A good handheld POS terminal should feel natural in the hand and stay reliable on the floor, at the bar, on the patio, and near the counter line.
Here’s what to focus on:
1. Ergonomics and screen size
Choose a shape and weight that fits one-hand use.
Aim for a screen big enough for fast modifiers and seat numbers, but small enough to carry all shift.
Test glare and brightness if you run patio service.
2. Durability and battery life
Look for drop resistance and a build that withstands spills and heat.
Plan for peak coverage: long battery life helps your team avoid mid-shift swaps.
Set a simple charging routine so devices start every shift at full power.
Prioritize strong Wi-Fi performance in every service zone, including patios and corners of the dining room.
Confirm how the device behaves during a brief disconnect, then check how it syncs orders and payments after the signal returns.
4. Device management
Use tools that let you assign devices, manage updates, and lock down settings.
Keep sign-ins quick, permissions clear, and access to comps, voids, and refunds controlled.
5. Tip capture and signature or PIN flows
Make tipping easy at the table with clear prompts and digital receipts.
If your payment flow requires a signature or PIN in some cases, ensure the prompts feel smooth, and the steps remain consistent across devices.
If you align the device to your service flow first, your staff adapts faster and service stays tight on the busiest shifts.
Handheld POS Software Features to Look For
Great handheld POS software keeps service moving from the first order to the final payment. Focus on features that cut taps, prevent mistakes, and keep the kitchen and floor aligned.
1. Menu modifiers that stay fast
Build modifier groups that mirror how guests order: temps, add-ons, sides, allergies.
Use forced prompts where needed so staff captures key details before sending the ticket.
Keep common upsells easy to add during table or line service.
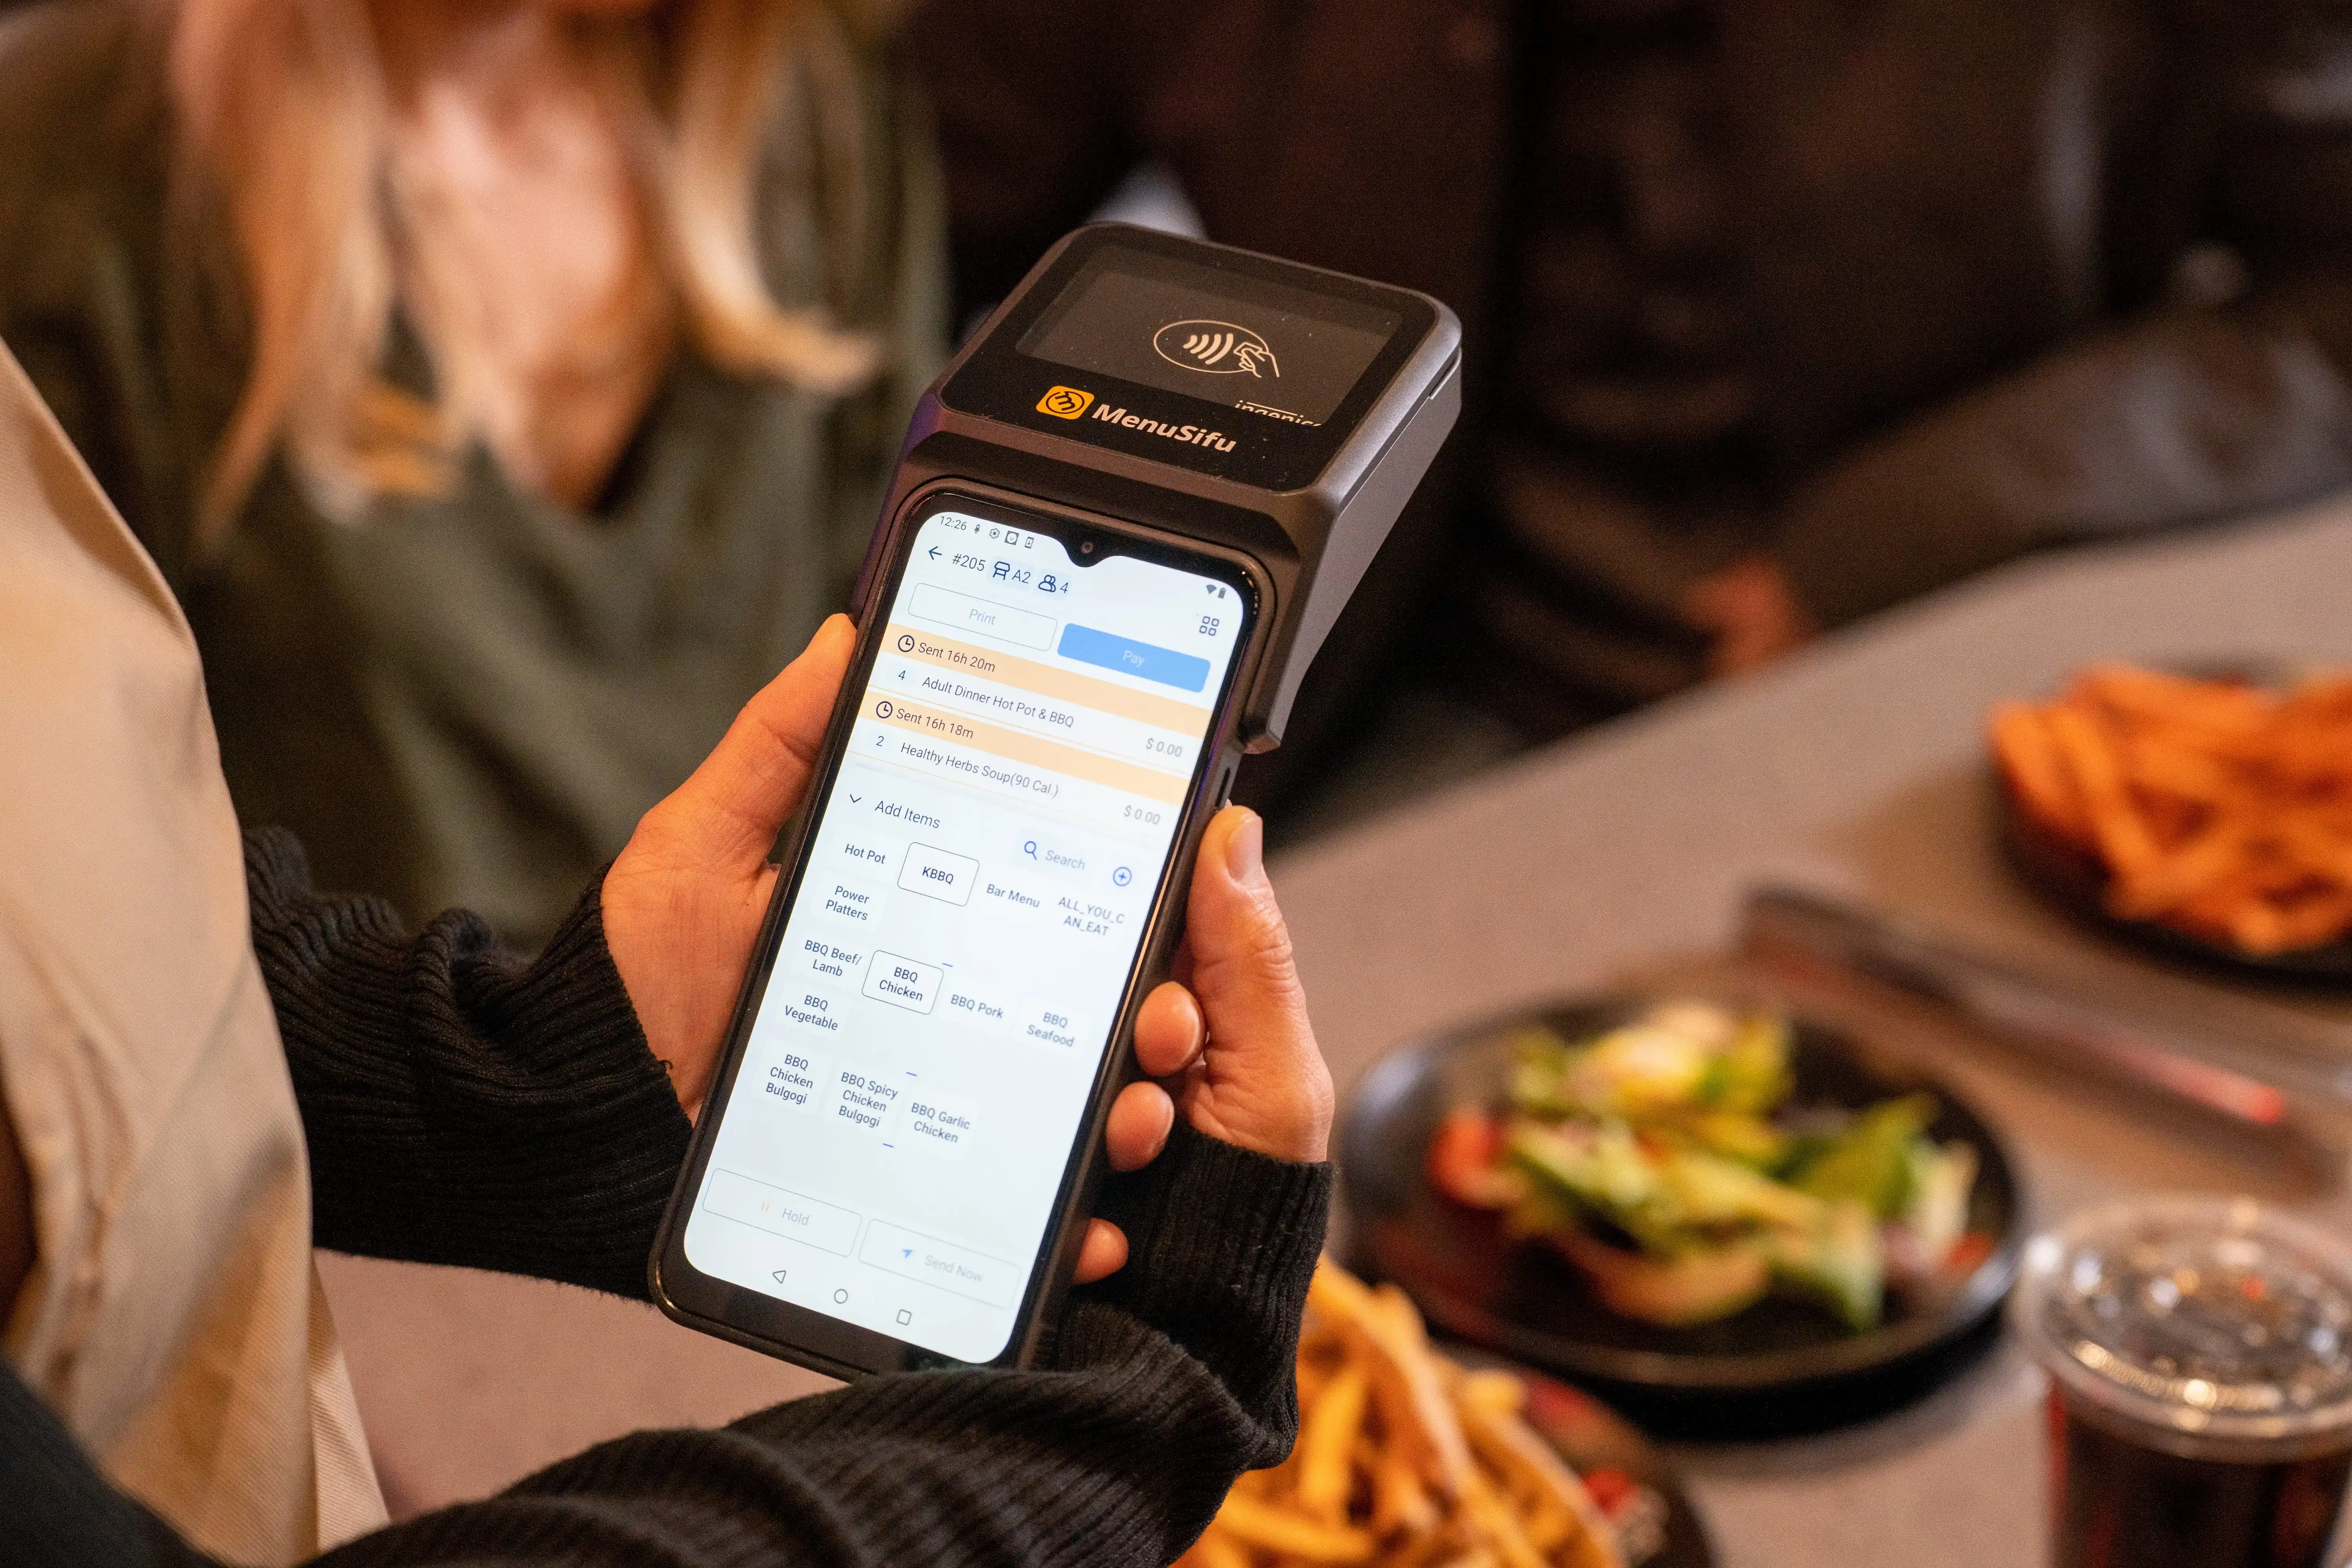
2. Coursing and firing that match your kitchen
Set courses for apps, mains, desserts, and bar rounds so tickets land in the right order.
Fire items from the handheld when timing changes, especially for larger parties and patios.
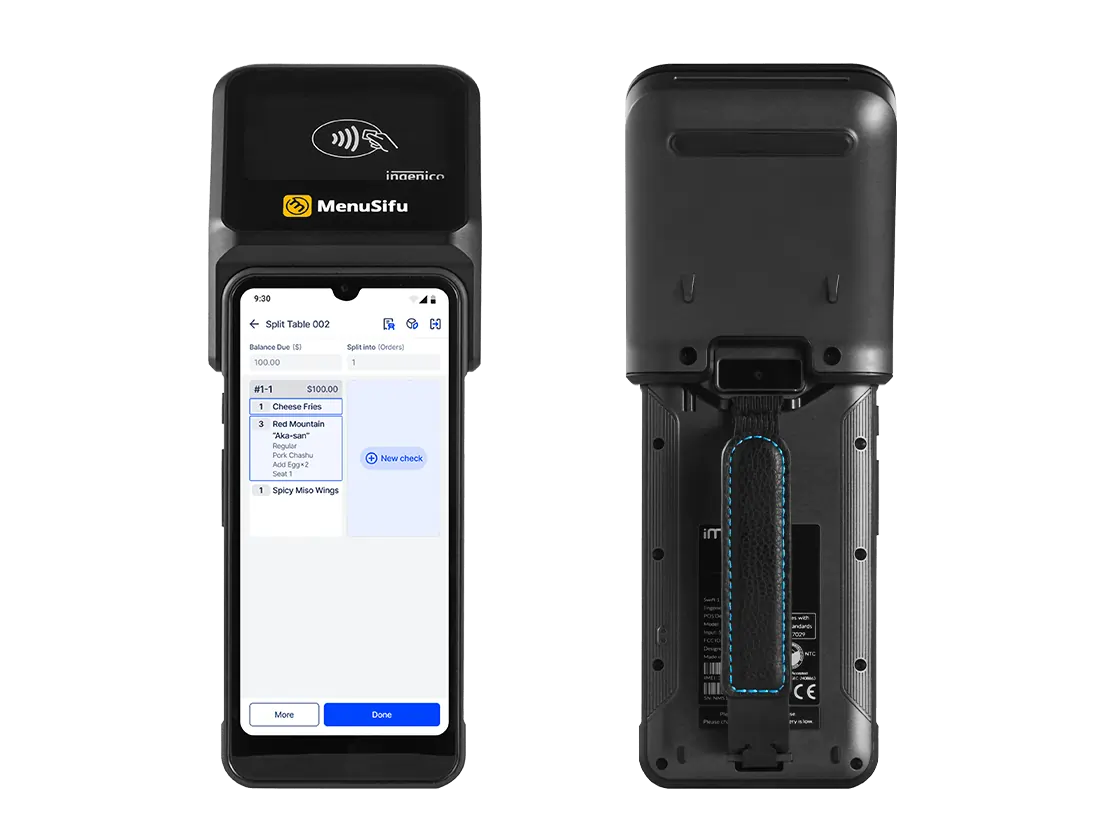
3. Split checks and seat numbers done right
Assign seat numbers quickly so staff can split bills cleanly and close checks faster.
Support partial payments and shared items for groups, bar guests, and family-style tables.
4. Bar tabs, refunds, and void controls
Open, transfer, and close tabs quickly during rush.
Handle refunds, voids, and comps with clear reasons so end-of-day reports stay clean.
Require manager approval for sensitive actions to limit surprises later.
5. Permissions and audit trails you can use
Set role-based access for servers, bartenders, shift leads, and managers.
Track edits, discounts, and voids with timestamps so reviews take minutes, not hours.
Kitchen display (KDS): Send orders instantly and route items to the right stations.
Inventory: Track key items and reduce 86 issues during service.
Loyalty: Capture repeat visits and rewards at checkout.
Accounting: Sync sales data for smoother reconciliation.
If your handheld workflow feels smooth in the dining room, bar, patio, and counter line, your software setup is doing its job.
Handheld POS Machine Options: Dedicated vs Phone-Based
Most teams land on one of two setups: a dedicated handheld POS machine built for restaurants, or smartphones running handheld POS workflows. Both can work, but they fit different service floors.
Dedicated handheld hardware
Dedicated devices hold up better during long shifts and busy service.
Pros
Reliability: Restaurant-grade hardware runs consistently through rush periods.
Payment acceptance: Many units support integrated tap, chip, and swipe in one device, so staff can take payment at the table or bar.
Durability: Built for drops, spills, heat near the line, and constant handling.
Lower downtime: Fewer surprises from OS updates or personal settings.
Cons
Upfront cost: Higher initial spend than a phone-based setup.
Replacement planning: You’ll want a spare device or two for peak shifts.
Phone-based handhelds
Phone-based setups can lower initial cost, but they often rely on accessories and tighter process control.
Pros
Lower starting cost: Useful for testing a section or adding limited mobile coverage.
Quick deployment: Add devices fast when staffing or volume changes.
Cons
Reliability swings: Consumer phones vary by model, battery health, and background apps.
Payment flow: Payments may require add-ons, extra steps, or separate readers, depending on your setup.
Durability: Drops and spills happen, and consumer devices tend to show wear faster.
Replacement cost: A broken device can become an urgent same-day problem during a busy week.
Best fit by service style
Use your floor flow as the guide:
Table service: Dedicated handhelds usually win for tableside ordering and pay-at-table because they stay stable, support payments cleanly, and survive constant use.
Bar and patio: Dedicated devices handle tab volume and outdoor service better, especially when staff moves quickly between guests.
Counter service with runners: Phone-based devices can help with line support and floor ordering, while dedicated handhelds fit better if you want integrated payments and rugged hardware across every shift.
If you plan to use mobile devices every day during peak periods, dedicated hardware typically pays off through fewer interruptions and smoother payments. If you want limited coverage for specific rush windows, phone-based can work as a starting point.
Faster Service with Handheld Point of Sale
Speed starts at the table, the bar rail, or the line, not at a fixed terminal. A handheld point of sale helps your team send clean tickets to the kitchen in real time, so cooks start sooner and servers stop making extra trips.
Cut order-to-kitchen time
When staff takes the order on a device and sends it right away, the kitchen receives it instantly. That trims the gap between “ready to order” and “ticket on the rail,” especially during rushes or when the patio fills up.
Reduce errors at the source
Most mistakes happen during re-entry. Tableside entry solves that. Your staff can:
Confirm modifiers while the guest speaks (temps, sides, add-ons).
Add allergy notes immediately.
Review the order before sending, while everyone still sits at the table.
Modifier prompts also keep common misses from slipping through, like dressing choice, cook temp, or side swap.
Mini workflows by concept
Full-service dining
Greet, take drink order on the handheld, send to bar.
Return, take food order at the table with modifiers and seat numbers.
Send the ticket to the kitchen right away.
Add dessert or another round from the table when guests decide.
Casual dining and bar service
Open a tab at the table or bar seat.
Ring drinks fast, send to bar printer or KDS.
Add apps and reorders from the floor during peak traffic.
Close out on the spot when guests ask for the check.
Fast casual with runners
Take orders on the floor when the line builds.
Enter customizations and upsells at the point of order.
Send to the kitchen instantly, then route pickup to the right runner flow.
Keep the counter clear for pickups and payments that need it.
The goal stays simple: capture the order once, send it immediately, and keep service moving where guests are.
Payments with Handheld Point of Sale Systems
Payments can slow service more than taking the order. Handheld point of sale systems fix that by letting staff close checks right where guests sit, stand, or line up. The result: quicker turn times, fewer abandoned checks, and a cleaner end-of-shift close.
Here’s what to cover in your payment flow:
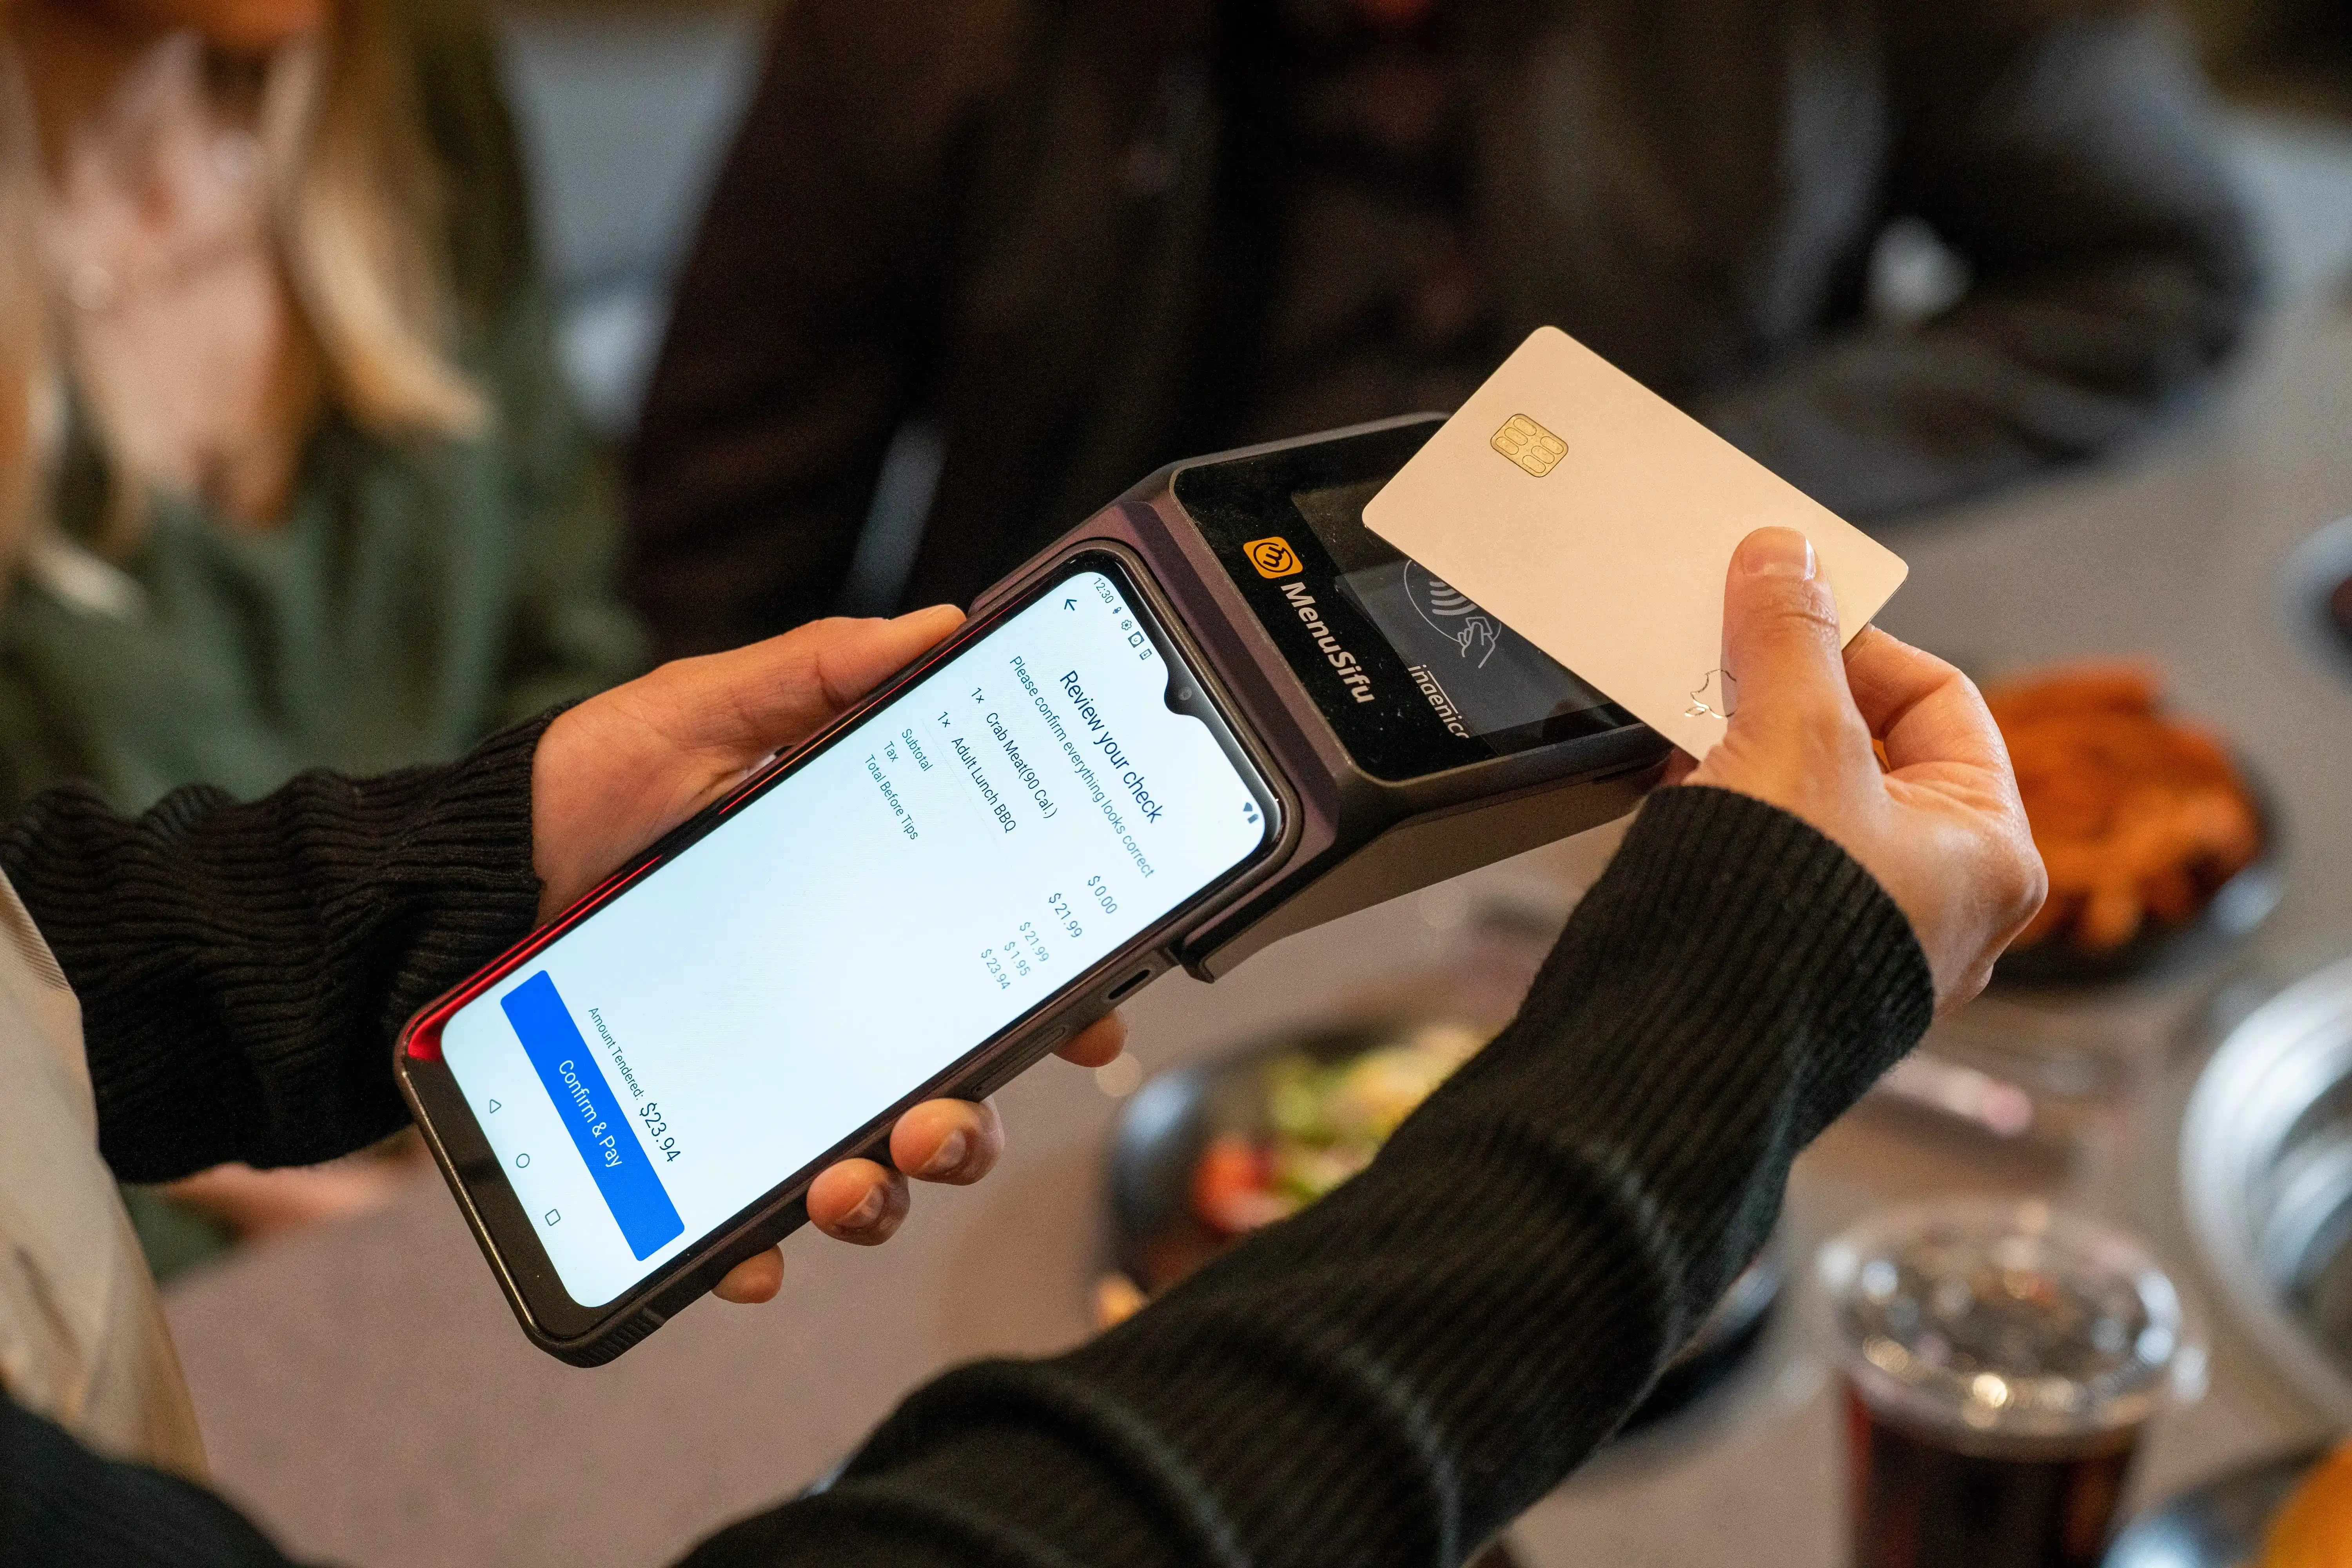
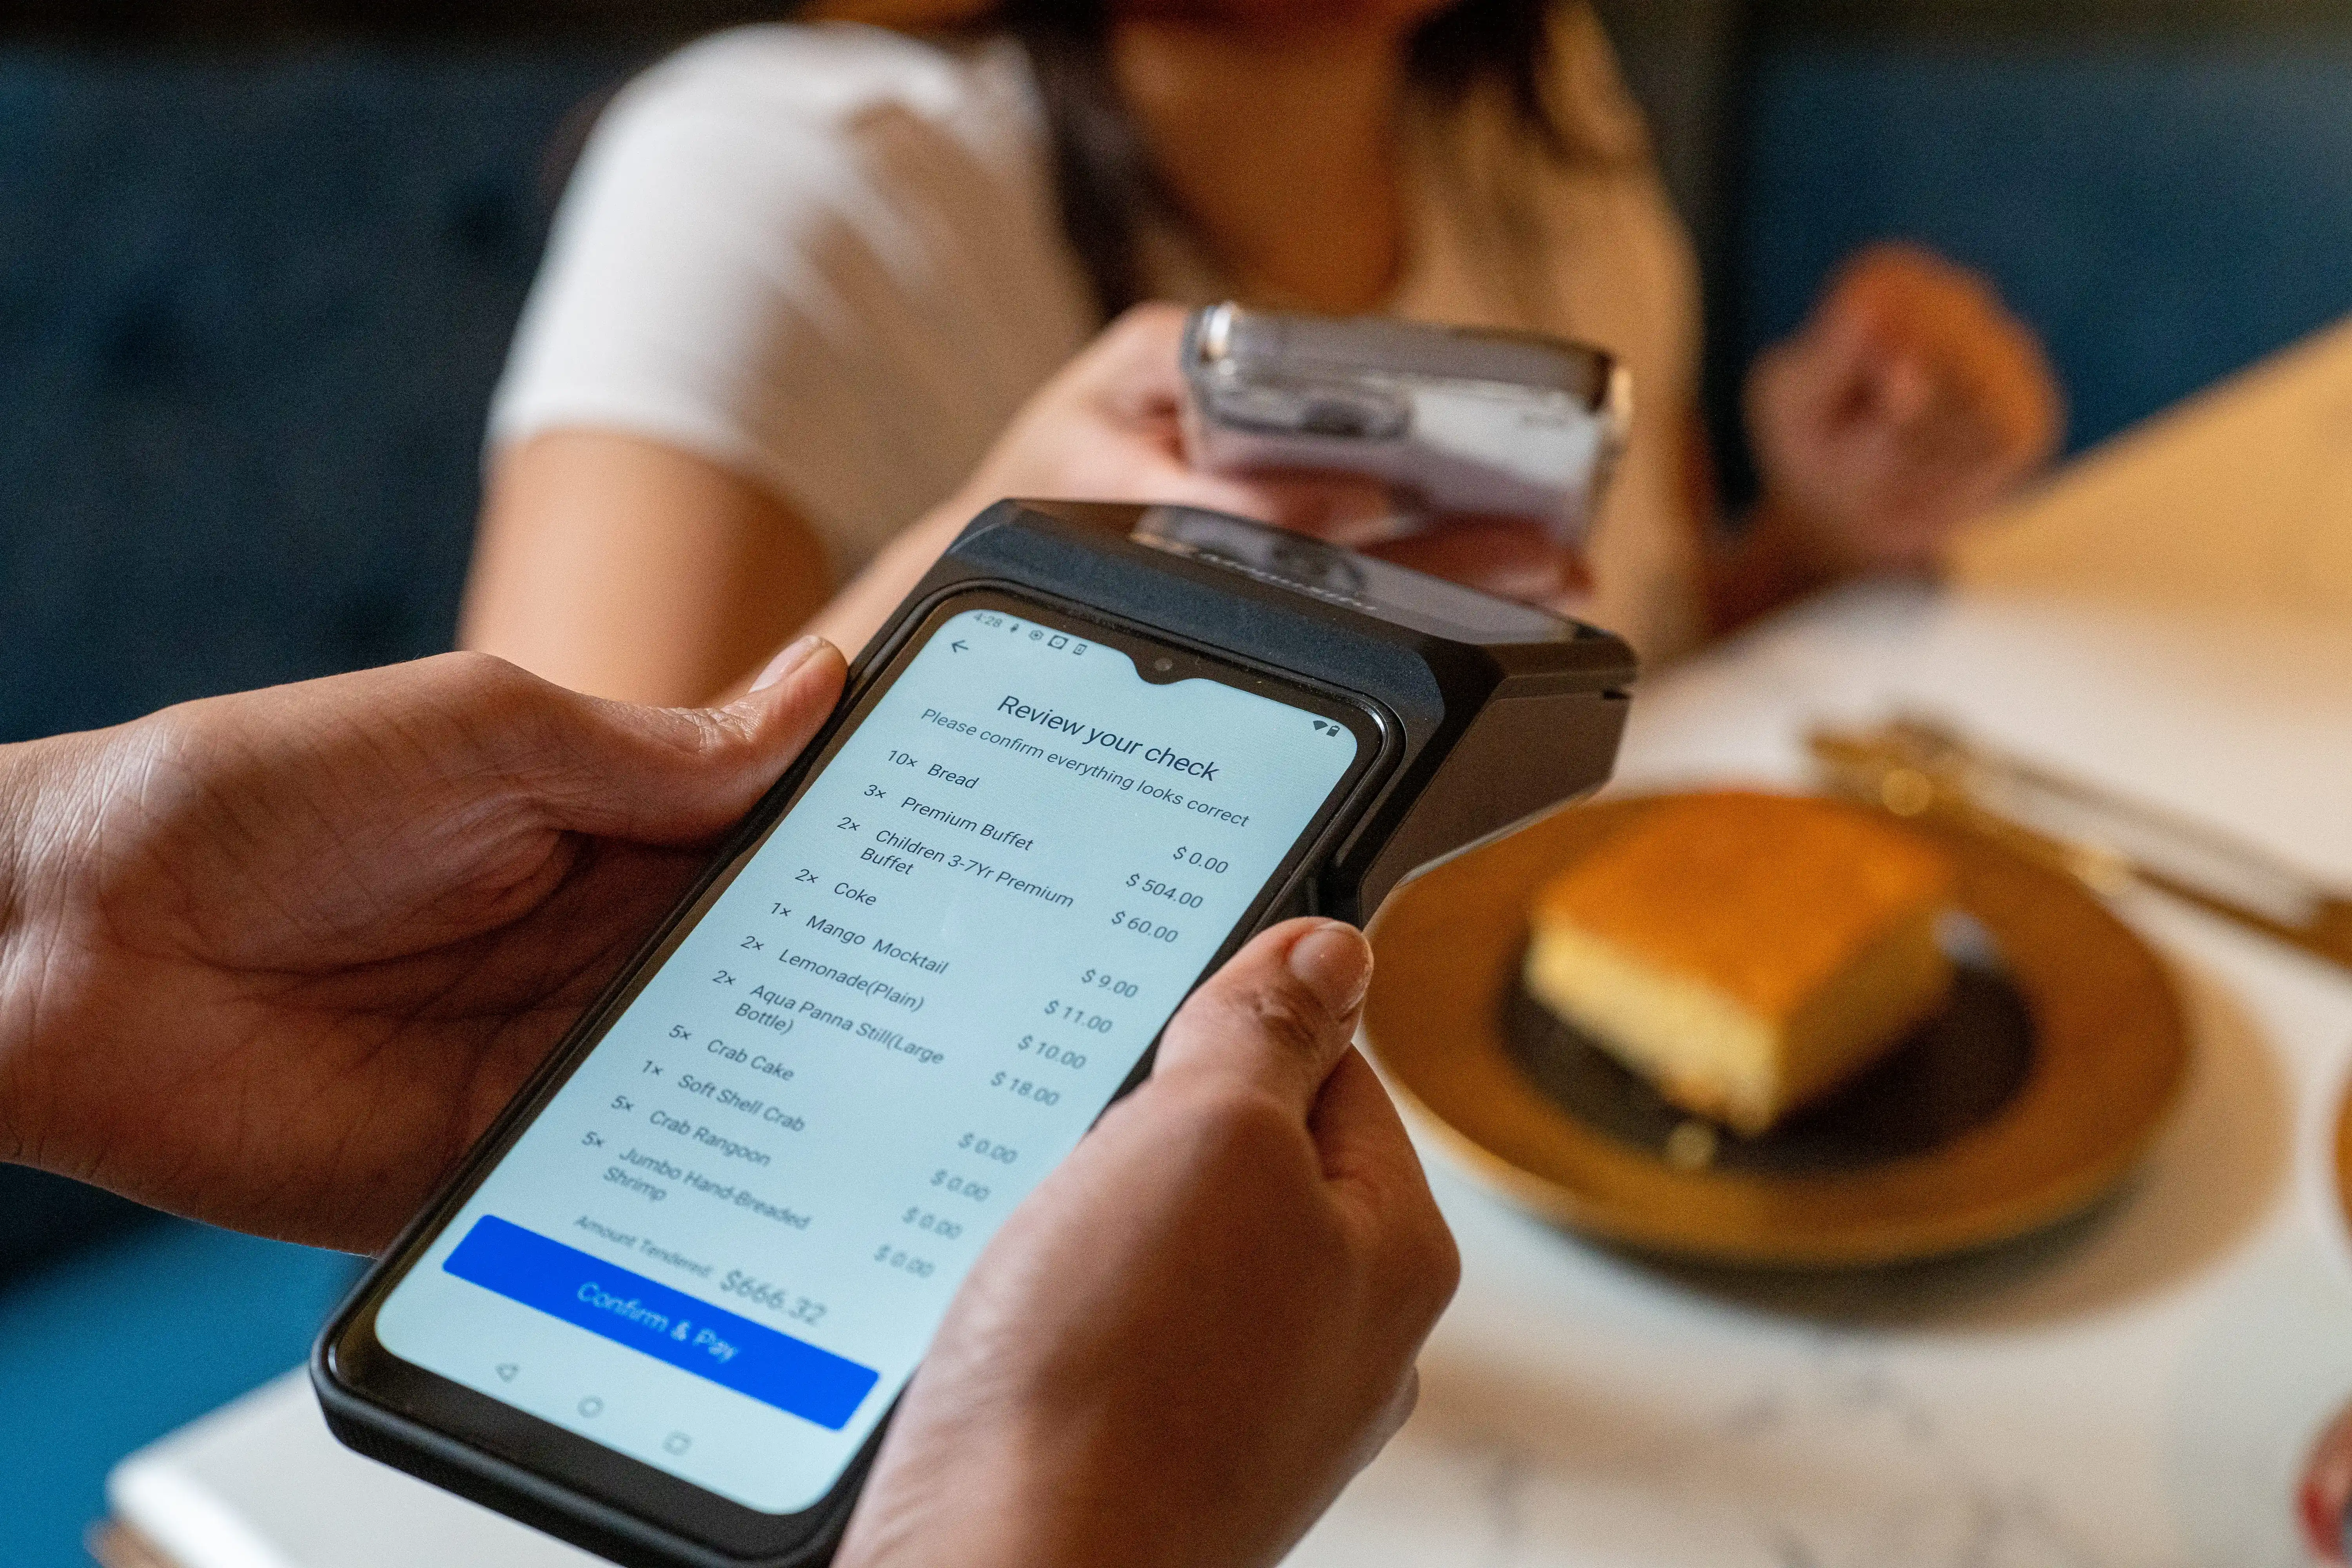
Pay-at-table: Present the check, split it, take payment, and send a digital receipt in one visit to the table. No extra trips back to a terminal.
Tap-to-pay, chip, and swipe (where supported): Tap keeps lines moving and speeds up bar closeouts. Chip supports higher ticket totals and formal checkout steps. Swipe helps in settings that still require it.
Smoother tipping: Show tip prompts on-screen, capture tips digitally, and reduce manual edits later. Staff sees fewer “forgot to tip” moments, and managers spend less time reconciling.
Fewer walkouts: Guests pay as soon as they’re ready, especially on patios and during peak bar traffic, so checks don’t sit unattended.
Security basics:
PCI-aligned processing through your POS provider and payment setup.
User permissions so only managers can void, discount, or reopen closed checks.
Device passcodes and auto-lock to protect open tabs and payment screens.
When payments run at the table or on the floor, service feels tighter and your team gets back to the next guest faster.
Restaurant Handheld POS System Setup Tips
A smooth rollout starts with three things: tight training, a menu built for speed, and a device plan that matches your rush.
1) Staff training checklist (FOH + bar + runners)
Keep training short and hands-on. Run real scenarios from open to close.
FOH
Start a table, assign seats, and add modifiers quickly.
Send courses in the right order, then fire items on time.
Split checks, take partial payments, and close with a tip.
Handle comps, voids, and manager approvals the right way.
Bar
Open tabs fast and attach a card when needed.
Move drinks to the right table or seat.
Add rounds, transfer tabs, and close out quickly.
Reopen a tab and keep tip entry clean.
Runners
Read ticket notes, allergy flags, and seat numbers.
Confirm table destinations before dropping food.
Flag missing items back to the kitchen fast.
Tip: Train for speed first, then add edge cases like refunds and transfers.
2) Menu build best practices for speed (combos, modifiers, upsells)
Your menu build decides how fast staff can ring and how clean tickets look.
Put top sellers first: fewer taps during rush.
Use smart modifier sets: group temps, sides, add-ons, and allergy notes in logical order.
Limit modifier sprawl: remove rarely used options that slow entry.
Build combos for fast casual: bundle mains, sides, and drinks with one tap.
Add guided upsells: place the best add-ons where staff will see them at the right moment.
Name items clearly: avoid similar item names that lead to mis-rings.
Quick rule: If staff hunts for an item twice, rework the category or button layout.
3) Floor coverage strategy: how many devices per shift
Device count should match service flow, not total headcount. Start lean, then adjust after a week of real data.
A practical starting point:
Dining room: 1 handheld per 2–3 active server sections during peak
Bar: 1 dedicated handheld for the bar team on busy nights
Patio: 1 handheld dedicated to patio service during peak hours
Counter service with runners: 1–2 handhelds for line support during rush, plus 1 for floor order taking if lines spike
Operational tips that prevent chaos:
Set a charging home base and a mid-shift swap plan.
Assign devices by role, not by whoever grabs one first.
Keep one spare device ready for peak and emergencies.
Get these three pieces right, and your handheld rollout feels natural on day one and stays stable on your busiest nights.
Handheld POS System ROI: What to Track
ROI gets clearer when you track a few numbers before rollout, then compare them after your team settles in. Keep it simple and focus on what handhelds affect most: speed, accuracy, and closeout time.
Start with these core metrics:
Table turns (or throughput per hour) Track covers per hour by daypart. For table service, watch turns during peak dinner. For bars, watch how quickly tabs open and close. For counter service, track orders completed per hour.
Average check size Compare average check and add-on rate. Tableside ordering and quick modifier prompts often lift appetizers, upgrades, and extra items.
Ticket times Measure time from order entry to kitchen receipt, then to first-fire time. Faster send times usually show up first, especially on patios and large floors.
Comps, voids, and re-rings Pull counts and dollar totals by shift. A drop here often signals cleaner ordering and fewer missed modifiers.
Then track the labor and line metrics that affect cash flow:
Labor hours per cover Compare total labor hours to total covers by daypart. When staff walks less and closes checks faster, covers per labor hour can improve.
Line length and wait time Use a quick manual count during peak, or track average wait time at the counter. Floor ordering can reduce the pileup at the register.
Payment time Track time from check drop to paid. Pay-at-table usually cuts this down, and bars feel it fast during peak.
A simple 30-day rollout plan for measurement
Days 1 to 7: Set your baseline Pull reports for the same days of the week you plan to compare later. Note peak hours, staffing levels, promos, and big events.
Days 8 to 14: Launch in one zone Start with the patio, bar, or busiest section. Keep training tight: order entry, modifiers, split checks, tips, closeout.
Days 15 to 21: Expand and tune Add more sections or more devices. Clean up menu buttons, modifier order, and tip prompts based on staff feedback.
Days 22 to 30: Compare and decide next steps Recheck the metrics above against your baseline. Look for steady improvement in ticket times, payment time, and comps/voids before you scale further.
Track fewer metrics, review them weekly, and tie every change back to service speed and order accuracy. That’s where handhelds tend to pay off first.
Bring Orders and Payments to the Floor
Handheld service tightens the parts of a shift that tend to drag: order entry, kitchen send times, and checkouts at peak. When your team takes orders where guests sit and closes checks on the spot, you cut extra steps, reduce re-rings, and keep tables, tabs, and lines moving.
It keeps tableside ordering and payments in one flow, so staff can ring items with customizations and allergy notes, sync menu updates and availability with the kitchen in real time, and handle add-ons or edits right next to the guest.
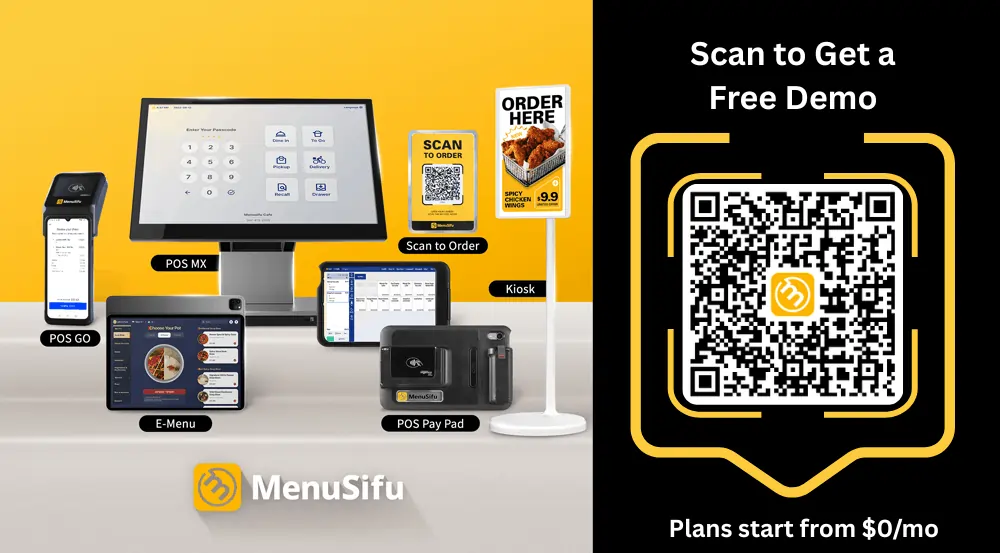
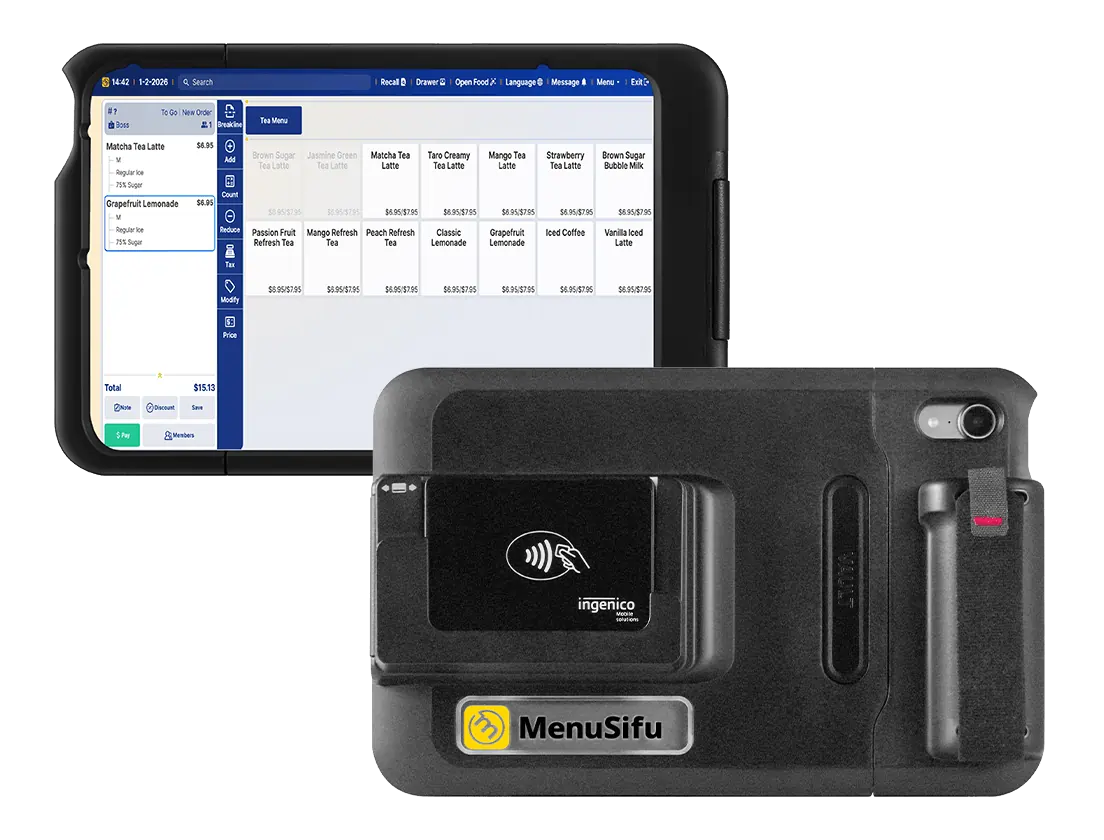
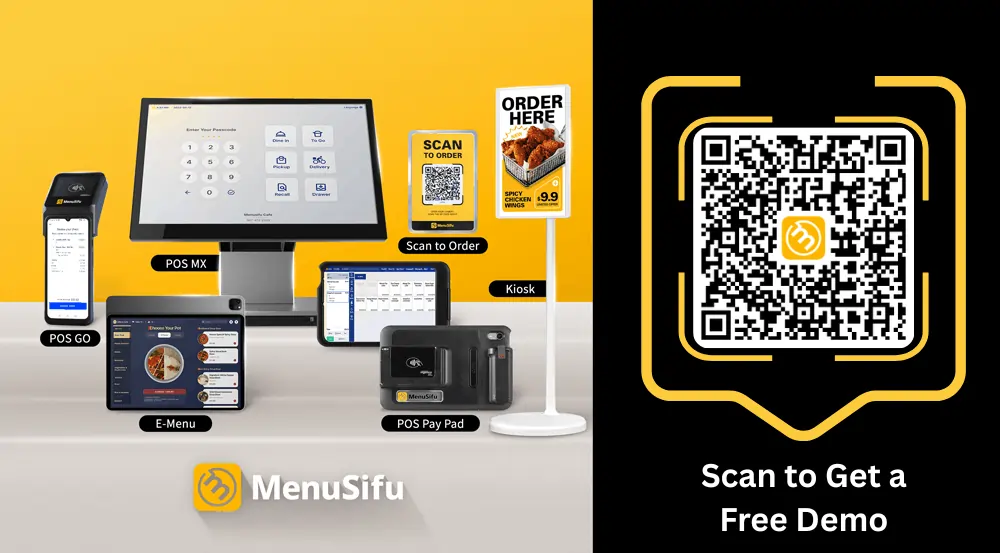
For hardware, POS Pay Pad gives you a large, easy-to-read display that matches your main terminal layout, while POS GO stays pocket-sized for all-shift mobility with a durable build and long battery life.
At checkout, your team can split checks, show itemized totals, suggest tips, and accept credit, debit, Apple Pay, gift cards, and house accounts. Digital tips record automatically, so the end-of-day close gets cleaner.
Explore Our Solutions, then Book a Demo when you’re ready to compare handheld workflows side by side.
Frequently Asked Questions About Restaurant Handheld POS Systems
If you’re narrowing down options, these FAQs address the details that tend to come up during evaluation.
What is a POS Handheld?
A POS handheld is a mobile point-of-sale device that lets staff take orders, send tickets to the kitchen, manage tabs, and accept payments right from the dining room, bar, patio, or counter line. It connects to your main POS, so menus, pricing, and reporting stay synced across all stations.
Yes. Many POS providers offer mobile apps that let you take orders and process payments on a smartphone. For restaurant service, confirm these basics before you rely on it: secure login and permissions, full menu modifiers and seat-level ordering, stable Wi-Fi support, and the right payment hardware for tap and chip. Phone-based POS can work for lighter shifts or quick line support, while a dedicated handheld POS terminal often holds up better for long services, busy patios, and frequent drops.
How Do I Choose Handheld POS for a Small Team?
Focus on speed and simplicity. Pick a handheld POS that lets a small team take orders, send tickets to the kitchen, and close checks in a few taps. Prioritize: (1) fast table-side order entry with modifiers and split checks, (2) reliable Wi-Fi support plus offline protection, (3) long battery life and durable hardware, (4) easy staff logins and permission controls, and (5) payments on the device with quick tip prompts. Start with 1–2 devices for your busiest section or bar, then add more as you see faster turns and shorter closeout times.
Which Handheld POS is Best for Table Service?
For table service, pick a handheld POS that supports fast tableside ordering, seat-level checks, modifiers, coursing, and pay-at-table. MenuSifu fits that workflow with handheld options that let staff take orders at the table, send them to the kitchen instantly, split checks, capture tips, and complete payments right at the guest’s side. Look for durable hardware, long battery life, and a familiar interface that matches your main terminal so training stays quick.
What is the Best Handheld POS System?
For many restaurants, MenuSifu is one of the best handheld POS system options when you want tableside ordering and pay at the table in one flow. Your team can take orders at the table, send them to the kitchen instantly, split checks, accept tap or chip payments, and record digital tips right away. MenuSifu also offers portable device choices like POS Pay Pad and POS GO, so you can match the setup to your dining room, bar, and patio.
For more practical POS tips and service workflow ideas, check out the blog section for fresh insights and updates.